

Random Wire 143: Building an AllStar node using a Raspberry Pi 4 and Argon ONE case
August 8, 2025: The Zero Retries Digital Conference, a Raspberry Pi 4-based AllStar node build, what's on my bench, and some thoughts.

Time to register for the Zero Retries Digital Conference!

The inaugural Zero Retries Digital Conference (ZRDC) 2025 will be held in Everett, Washington, USA on Saturday, September 13, 2025. Registration is open.
That dry, emotionless statement completely obscures my excitement about this event. Zero Retries focuses on innovative digital projects that center around amateur radio. There is a lot of activity in the digital voice and data space at the moment, but most of these are not well known. Zero Retries is my source for information about new, leading-edge radio-related initiatives. To have a conference that focuses on topics that are very interesting to me is fantastic, and having it almost in my backyard makes it even better. If you can’t attend in person, please consider attending virtually. It’s going to be a very interesting day of sharing and learning.
ZRDC 2025 will showcase technological innovation in Amateur Radio as discussed in the Zero Retries newsletter. Planned presentations and demonstrations include (but are not limited to):
The IP400 Networking Project
M17 Digital Voice / Data system (including demonstrations with an M17 repeater)
MMDVM-TNC data system (including demonstration of MMDVM-TNC via repeater)
AREDN, HamWAN, and other Amateur Radio microwave networking
ZRDC 2025 will be held in the same venue as the GNU Radio Conference 2025 - the Edward D. Hansen Conference Center in downtown Everett. GRCon 2025 will be held Monday September 8th through Friday, September 12th, 2025. Registration is open as explained at https://www.zeroretries.org/p/conference. (The direct link to the ZRDC registration is available at https://lp.constantcontactpages.com/ev/reg/7852x9m).
Since I’m unable to attend in person that day, I have registered for the live Zoom attendance.
ZRDC 2025 is sponsored by the Zero Retries newsletter. If you are interested in technological innovation in amateur radio, you will likely enjoy the Zero Retries newsletter. I read every weekly issue from start to finish, and I always learn something new. Zero Retries is Random Wire Recommended.


Fingers in the Pi, part 2: Building an AllStar node with a Raspberry Pi 4
This was a fun little project with some good learning involved. Along the way, I discovered a great feature that made the project worthwhile.

Components
The single board computer (SBC) I chose for this is the Raspberry Pi 4. Last week, I reported on a similar build based around an RPi 5 and an Argon NEO case with NVMe support. I learned some things in that project that made this week’s RPi 4 project easier and more enjoyable.

This week, I’m using an RPi 4 with 8 Gb of RAM because this seemed to make the RPi 5 in last week’s project run more smoothly: more RAM = better performance. You could get by with 4 Gb of RAM but I like the extra headroom the 8 Gb of RAM provides. I also chose a CanaKit kit because (a) I’ve had very good luck with CanaKit products and (b) it included a good power supply with a shielded cord. Cost: $94.99.
CanaKit Raspberry Pi 4 Basic Kit (8GB RAM) (this is an affiliate link)
The RPi 4 was paired with another Argon case, but this time I used the Argon ONE M.2 case made for the RPi 4. It’s a little larger than the NEO case for the RPi 5, but as you’ll see, that is because of the way the HDMI ports are converted from microHDMI to full-size HDMI ports. This is not a cheap case. Cost: $47.00.
Argon ONE M.2 Aluminum Case for Raspberry Pi 4 with SATA SSD Support | Power Button and Fan | Compatible B-Key and B+M Key (this is an affiliate link)
For mass storage and to serve as the boot drive, I selected a 512-Gb solid state drive (SSD) for $29.99.
Timetec 512GB SSD 3D NAND SATA III 6Gb/s M.2 2280 NGFF 256TBW Read Speed Up to 550MB/s SLC Cache Performance Boost Internal Solid State Drive for PC Computer Laptop and Desktop (512GB) (this is an affiliate link)
By the way, if you get this case, you can also pick up an Argon remote control for the RPi 4 at a cost of only $10 (battery not included). This was sufficiently interesting that I spent the extra $10 on the off chance the “safe shutdown” button would work with the AllStar node, and in case I repurpose the platform later on as a media server.
Argon IR Remote for Argon Raspberry Pi 4 Cases | with Programmable Buttons and Safe Shutdown (this is an affiliate link)
Not including the optional remote control, the system components totaled $171.98. As an Amazon Prime member, I got free shipping on these items. I did not include the cost of a microSD card because (a) I already had one on hand and (b) it turns out you can build an AllStar node in this case without using a microSD card!
Alternatives
You could use the RPi 5 platform I described last week. That’s an expensive solution. The value-oriented alternative is an RPi 3B+ single board computer. However, to my way of thinking, the RPi 4 is the way to go. By the time you add in a good quality power supply for the RPi, the 3B+ is almost as much as the RPi 4 kit. Comparing the RPi 4 to the RPi 3B+, the RPi 4 gives you slightly faster processing speed, more RAM, and a USB-C power port.
Argon makes a bunch of cases. I’m looking forward to trying some other ones in future builds, but I have to say I’m pretty happy with the Argon ONE M.2 case. You can see their Raspberry Pi 4 cases at https://argon40.com/collections/raspberry-pi-4-kits. They offer metal cases like the two I’ve used but also some well-ventilated plastic cases that are surprisingly inexpensive.
Assembling the case
In the image below you see everything included in the Argon ONE M.2 box. In the upper left is the top of the case, positioned upside down (you’re looking at the underside of the top of the case). The HDMI converter board is shown, and as you’ll see in a bit, those plugs mate directly with the RPi 4 board. The two silver-colored rectangles are heat sinks. Thermal conducting tape goes on those two rectangles. (The heat sinks that come in the CanaKit package cannot be used with the Argon ONE M.2 case.)
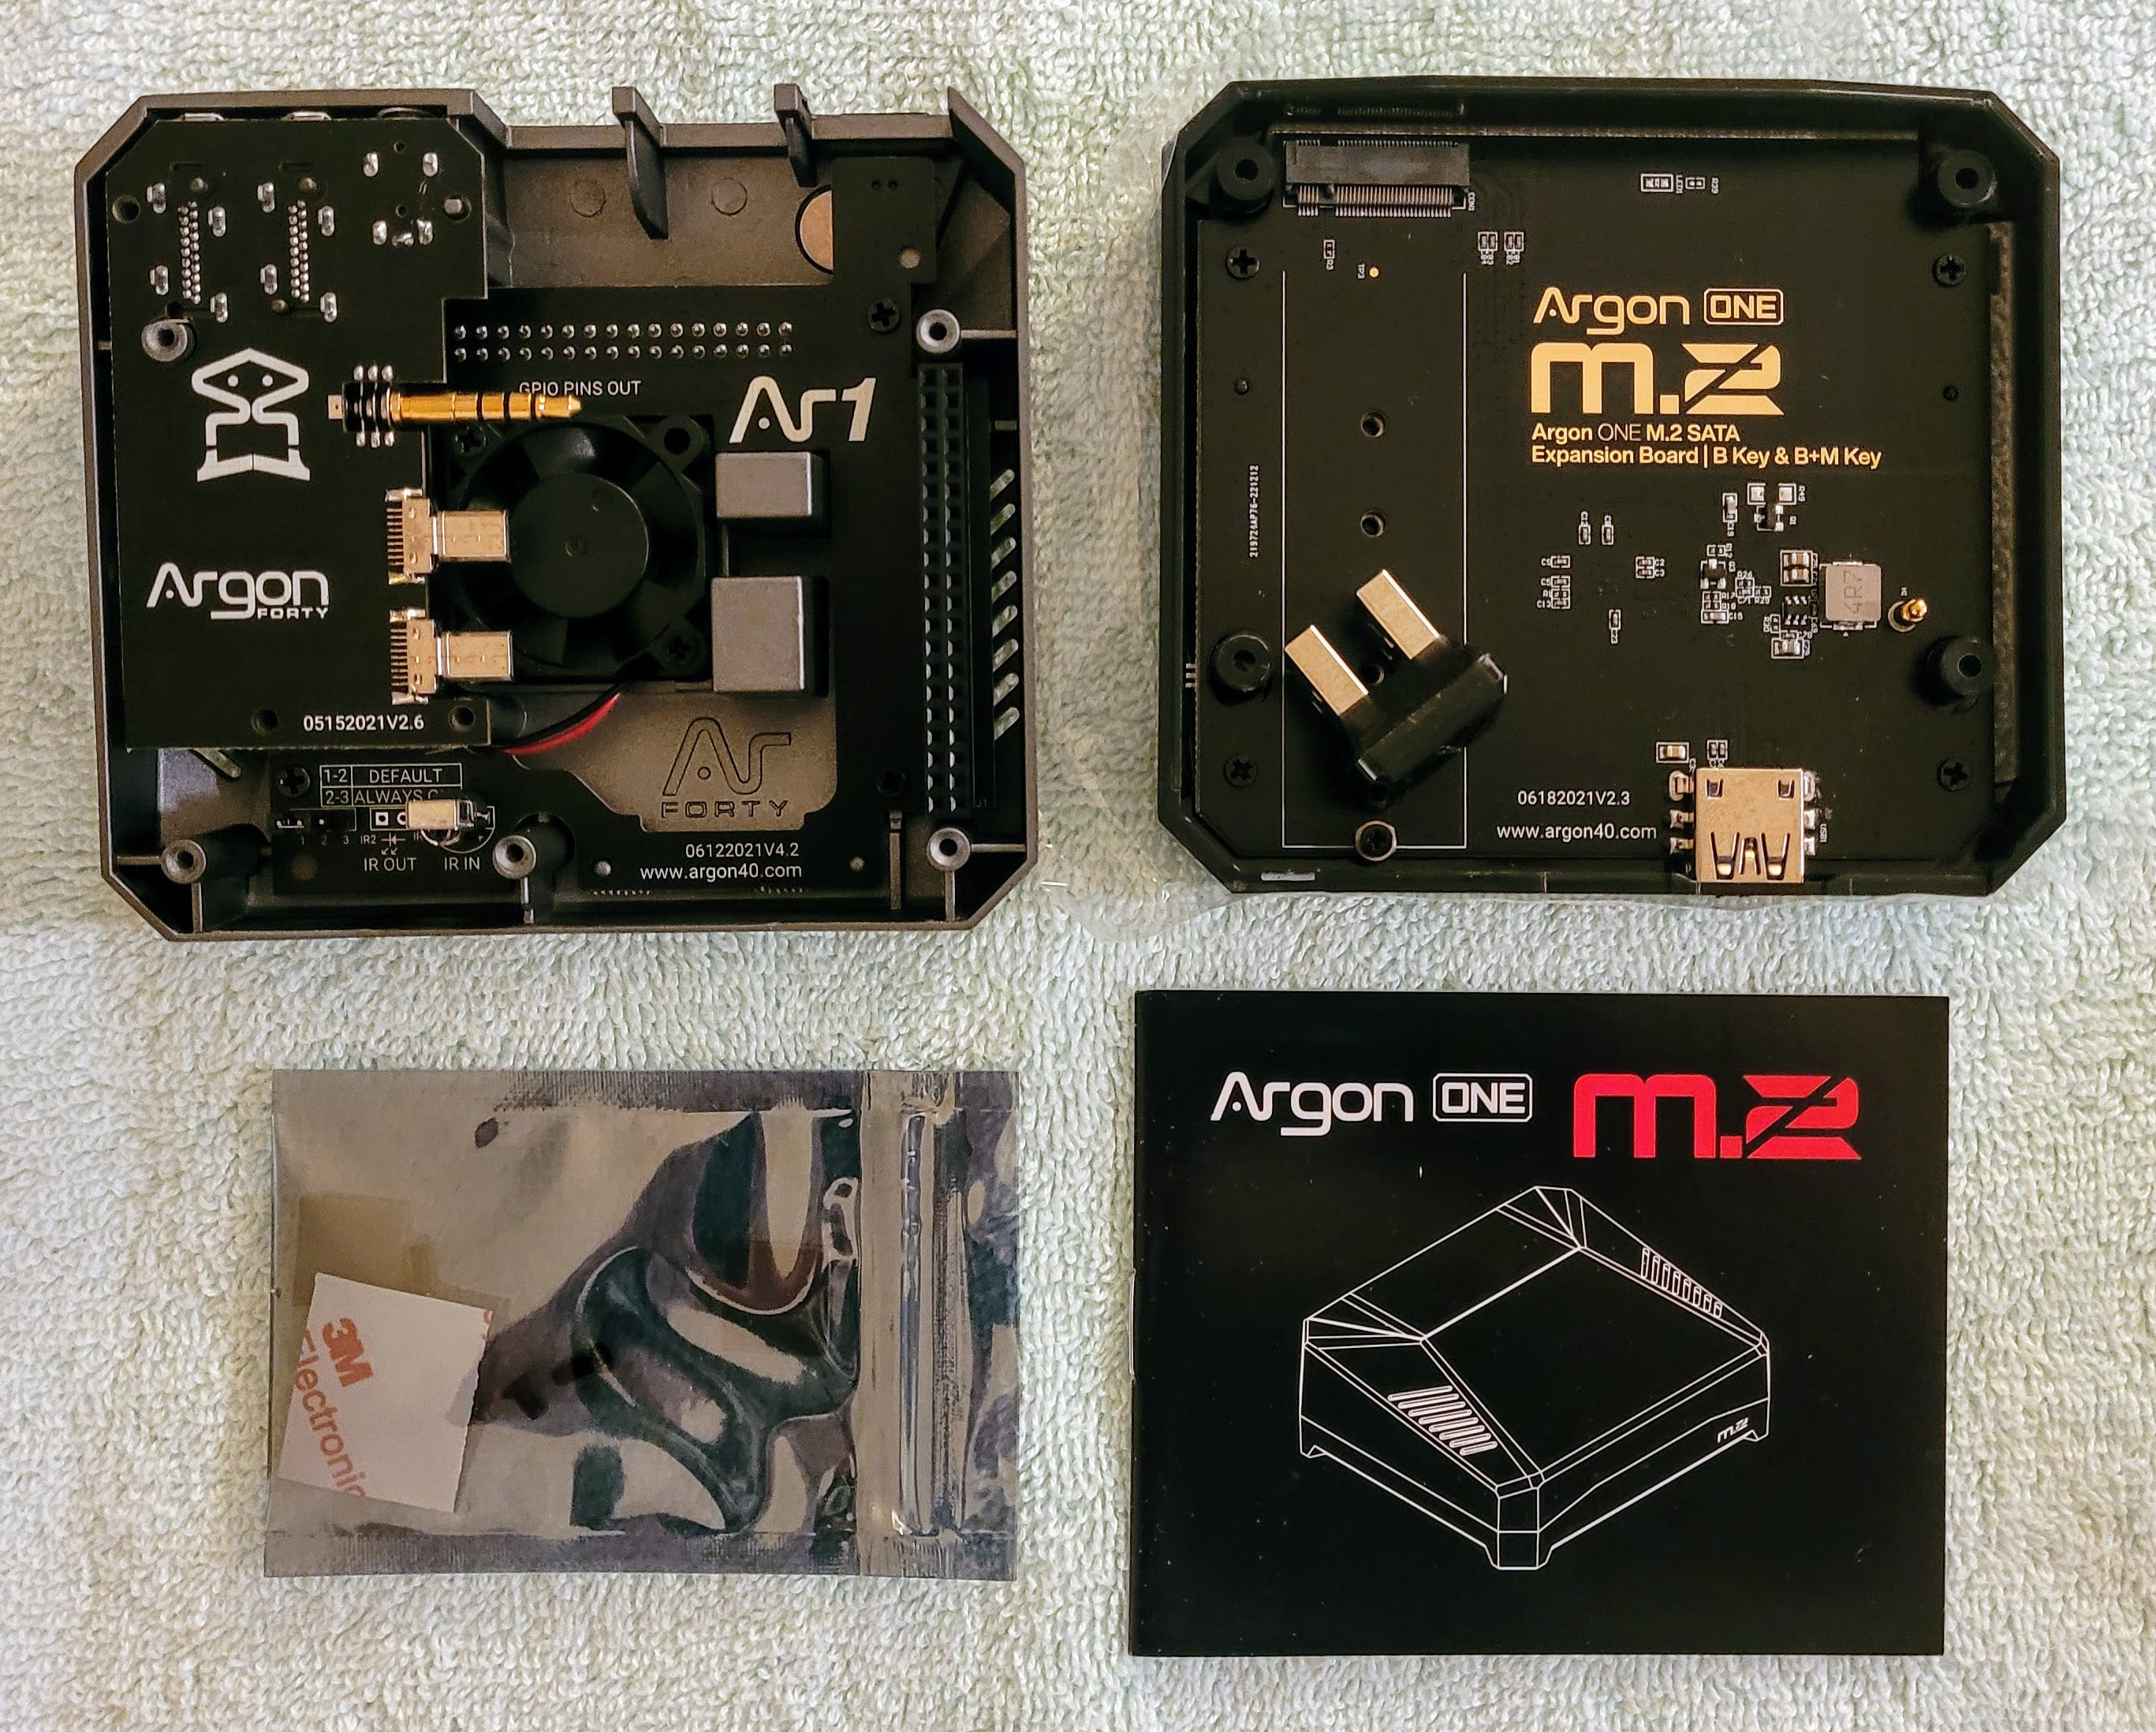
In the upper right corner is the M.2 expansion board in the bottom half of the case. This is where the SSD is mounted. Note that the case does not accept NVMe drives. Your drive must be a “B Key” or “B+M Key” device. These are explained in a post on the Argon forum. Also shown in the upper right of the photo is the bridging device that connects two USB ports, one in the top of the case and one in the base. This piece of information becomes important later when installing the AllStarLink 3 image is discussed.
The small anti-static bag includes screws, thermal tape, and four small vinyl feet for the case.
Installing the SSD
The screw that secures the end of the SSD is a bit tricky. I think of it as a screw within a screw. (I’m sure there’s a proper, official descriptor for this but I don’t know what it is called.) The smaller black machine screw screws into the larger brass-colored machine screw. If you’re not aware this is a two-in-one kind of thing, you might think it’s all one screw. Using it as a single screw to secure the SSD would put the SSD under some bending stress, so be sure to separate the two pieces. The brass-colored bit goes into the interface board, and then the black screw holds down the end of the SSD board.

If the two pieces are firmly screwed together as mine was, using needle-nose pliers to hold the brass bit while you unscrew the black bit. In the photo below, the brass screw is where it should be before adding the SSD drive.

Install the SSD board by inserting the end of the board into the port at a 20 to 30-degree angle.

The other end of the SSD board is pressed down until it contacts the brass screw, then use the smaller black screw to secure the board. This completes the assembly of the base.

Attaching the HDMI converter to the RPi
The RPi 4 board has two microHDMI ports, but the Argon ONE M.2 system converts these to full-sized HDMI ports using a smaller board that mates with the two microHDMI plugs and the single tip-ring-ring-sleeve (TRRS) plug on the RPi.

Those three plugs and ports firmly mate. Once the mated boards are secured inside the case, this is a pretty strong way to connect the RPi 4 board to the interface board.
In the photo below, the full-size HDMI ports are oriented vertically between my first and second fingertips in the upper right part of the image.

Follow the Argon ONE manual for the remaining steps, paying attention to where each screw goes, and the length of each screw.
Finally, connect the top and bottom sections with the C-shaped USB connector. This part is called the Argon ONE M.2 / Argon EON USB 3.0 Bridge as shown at https://argon40.com/products/draft-usb-3-0-usb-bridge. The bridge connector is how the SSD communicates with the RPi. (Stick a pin in this because we’re going to come back to it in a moment.)

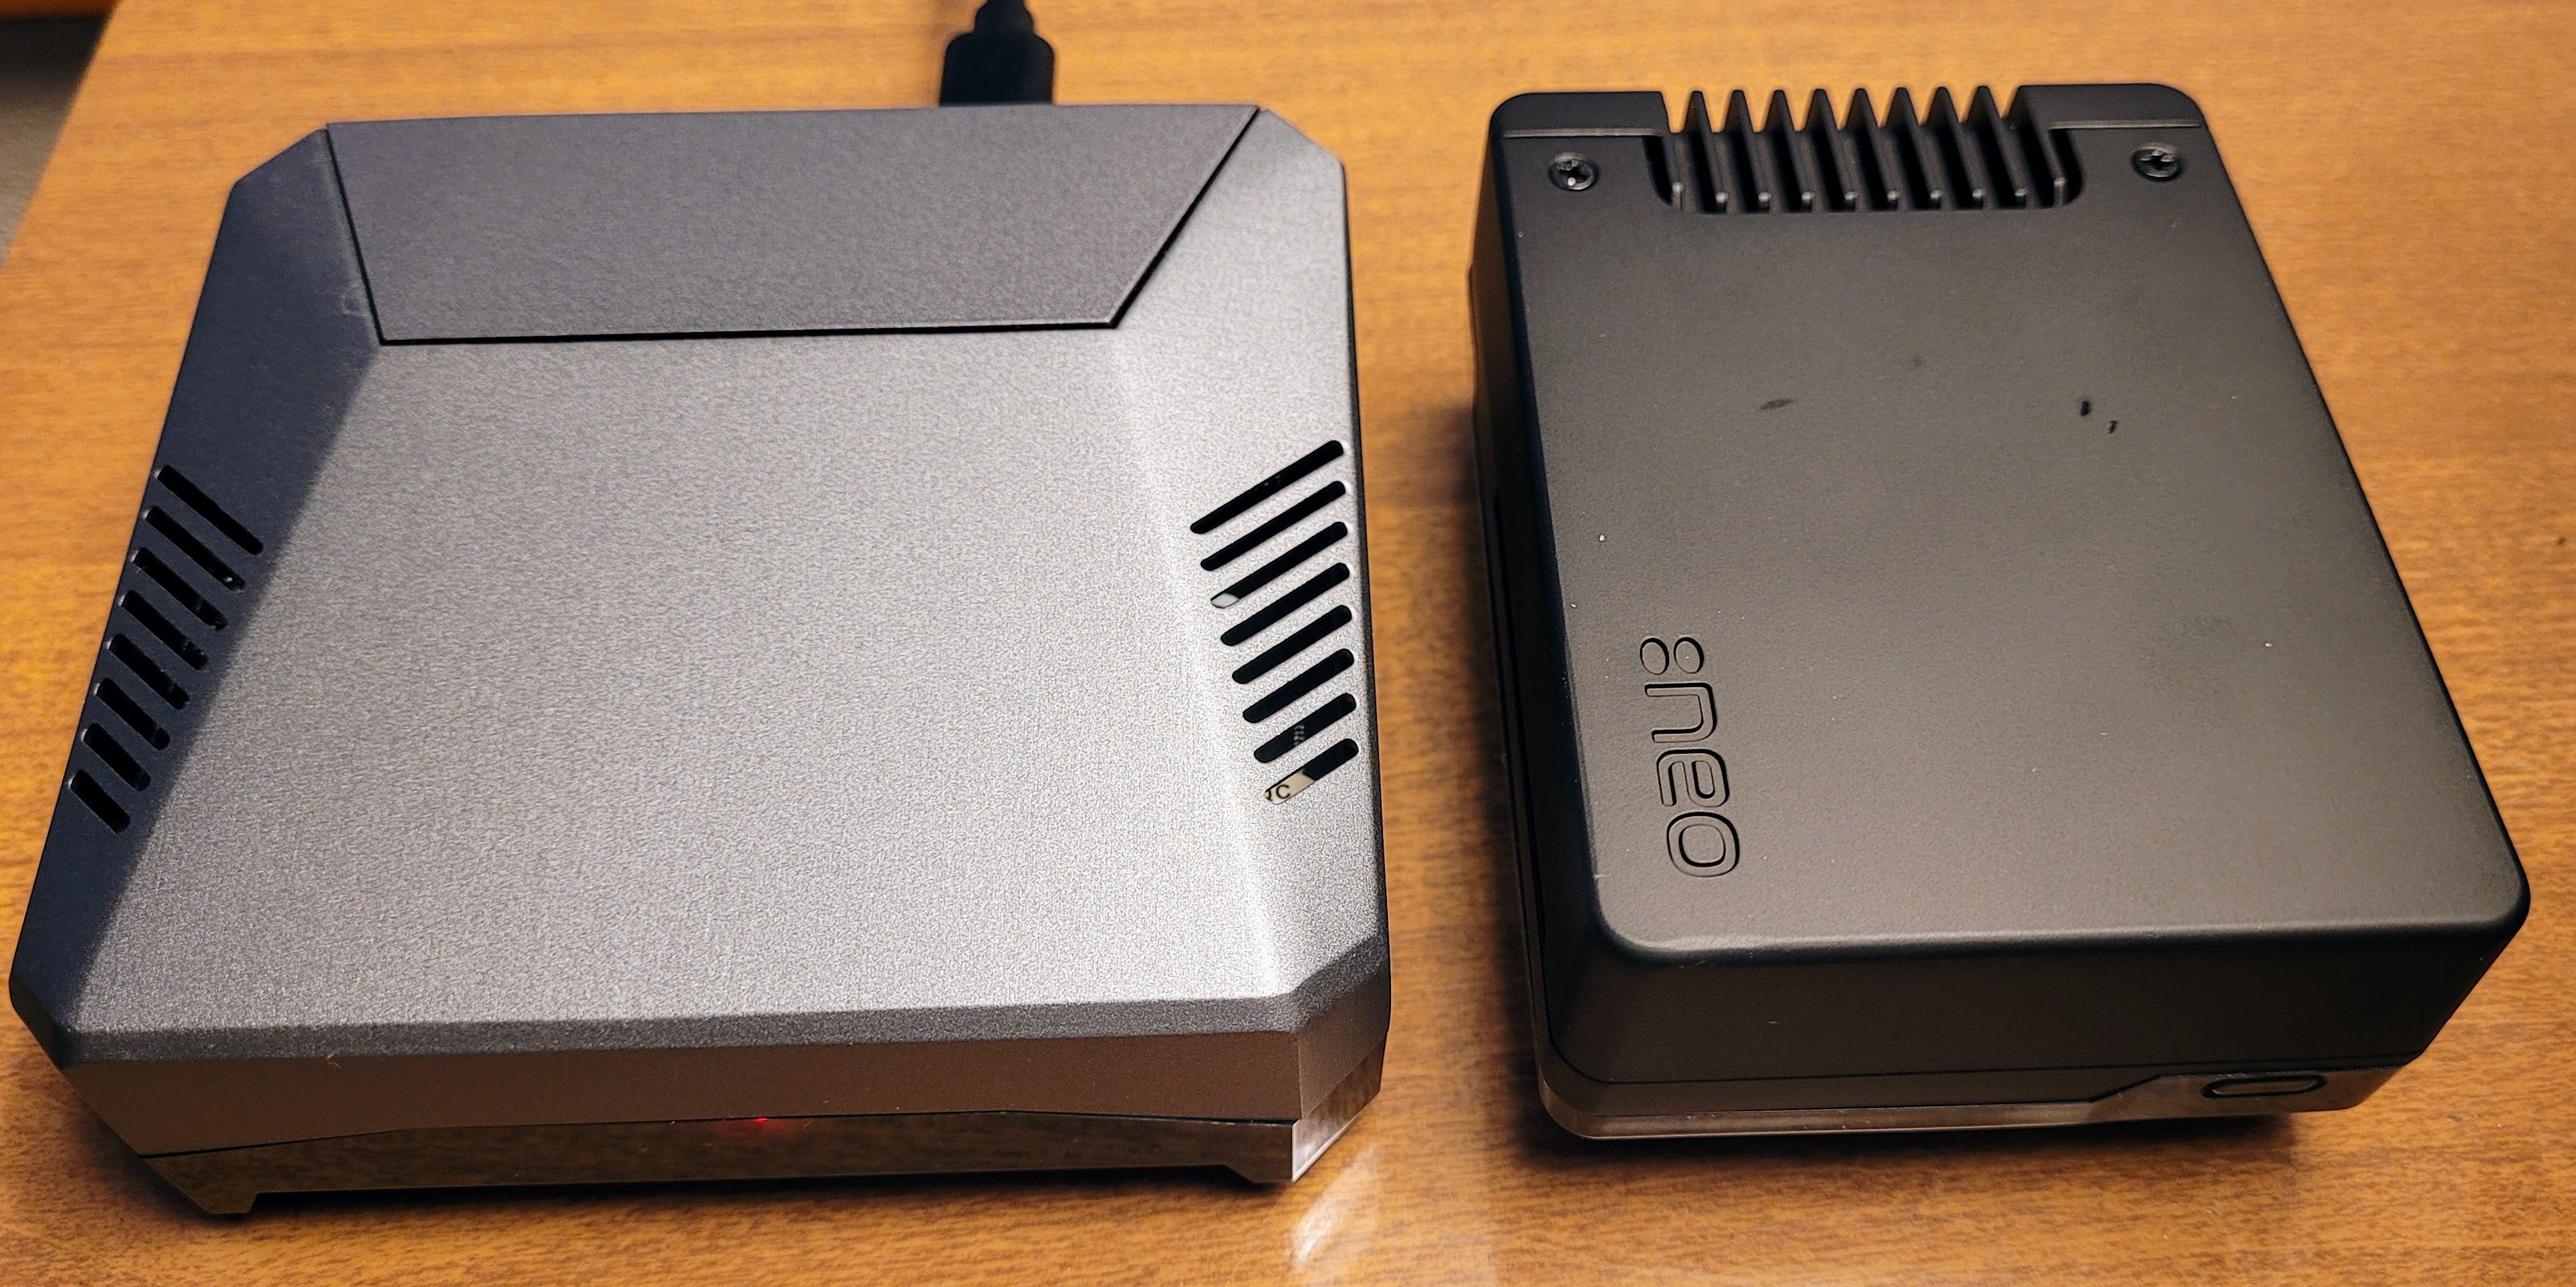
The assembled case is wider than the Argon NEO case and a tiny bit taller. GPIO pins are accessible through a removable cover on the top-rear of the case.
Installing the AllStarLink image
I followed the instructions at https://allstarlink.github.io/install/pi-appliance/pi-detailed/ to find the software for the ASL3 Appliance. Using the official Raspberry Pi Imager app on my Windows PC, I burned the image to a microSD card, put the card in the RPi4 slot, and booted up the machine.
Then, just like last week with the RPi 5 build, I used dd to copy the microSD to the SSD drive. You can see below that despite having a 512-Gb SSD drive, the copy on the SSD is exactly the size of the microSD card:

That’s not quite what I wanted. I have a big drive so I want access to it, and ideally, I want to boot from the SSD, not the microSD. I tried several methods to expand the boot drive but had little success. While I was searching for solutions, I ran across some four-year-old content on Reddit that indicated you could burn the boot image directly to the SSD.
Surprise: you don’t need a microSD card!
Pro tip: a good reason to select the Argon ONE M.2 case is you can install the operating system directly to the SSD, bypassing the usual step of burning an image to a microSD card.
Remember that funny-looking piece (the USB bridge) that connects a USB port from the top part of the case with USB port on the M.2 expansion board in the bottom part of the case? You can use this to connect your SSD to your PC, and then use the Raspberry Pi Imager app to burn the AllStarLink 3 image directly to your SSD.
I can’t overstate the importance of this method because it means you can load any RPi 4-compatible operating system directly to the SSD, bypassing the slower and more error-prone microSD card.
In my case, this gave me a 500 Gb drive that is bootable…without going through the intermediate steps of creating a bootable microSD card and then figuring out how to copy that image to your SSD and expand or resize the boot partition on the SSD. My RPi 4 build does not have a microSD card in it. A reboot from the SSD takes about 20 seconds from telling the RPi to reboot to accessing the Cockpit login screen.

Since I couldn’t find a USB-C to USB-A data cable in my cable pile, I made one using a USB-C to microUSB adapter in the USB-C port of my laptop, mated to a short data cable with a microUSB connector on one end and a USB-A connector on the other end.
I tried connecting this assembly directly to the USB-A port on the expansion board, but that did not work. What worked was plugging the C-shaped connector into the base, then connecting the other part of the C-shaped connector to my computer. The SSD’s power LED lit up and my computer recognized it had connected to a drive. In the photo above, you can see the green LED glowing on the SSD, indicating it was receiving power from the computer.
The Raspberry Pi Imager app saw the SSD and identified the drive as a SCSI drive:

After the Raspberry Pi Imager writes the image to the SSD, it then verifies the write.
I don’t know what magic is packed into that USB-to-USB bridge connector, but it is amazing to be able to install AllStarLink 3 directly to the SSD. This is a generally unheralded feature of the Argon ONE M.2 case. I am very pleased with this discovery. The case may be a bit pricey compared to others, but this feature alone makes it worth it to me.
As shown in the Cockpit screen on system storage, I now have a ton of room on this ASL node!

Heat
The RPi 4 is known to run warm. The Argon ONE M.2 case is all metal, except for part of the base. I replaced the supplied vinyl feet with slightly taller ones to provide for a bit more air flow. The fan inside the case is (so far, knock on wood) whisper quiet. The case gets warm, but it is nothing unusual.
Installing special scripts
Argon makes available a script that will gracefully shut down the device and control fan speeds at different temperature intervals. To install the script, follow the directions on page 12 of the Argon ONE M.2 user manual. I did that and it worked perfectly. On my RPi 4 in the Argon ONE case, I can initiate a graceful shutdown by holding the power button for more than three seconds. I tested that a few days ago and it works perfectly.
The scripts include a simple dashboard report on the status of the RPi:

On the bench
I have many things on the bench, waiting for me to have some free time.
Used CS7000 M17 Plus with GPS
The Connect Systems CS7000 M17 Plus is a handheld radio configured to use the M17 protocol. Says Connect Systems:
The CS7000 M17 Plus is the first Amateur digital radio that has the ability to have multiple protocols in a single radio. The first version of this radio will have DMR, M17 and Analog protocols.
I already have the standard CS7000 M17 radio. When I saw an offer for the Plus version in very good used condition, and at a steep discount, I said yes yes yes. I’ve barely started to use the Plus radio. I look forward to sharing with you how this journey goes.
Hams Over IP RF link
I have HOIP working on the Android Groundwire app and on my Polycom VVX-401 (this is an affiliate link) hard phone. What I haven’t figured out yet is RF linking to connect my Polycom phone to my AllStar node 588418. When I dial my RF extension on the Polycom phone, the phone tells me it has connected to node 588418. But when I link 588418 to an active net on another ASL node, I hear no audio through the phone. It has been a while since I configured a hard phone for ASL, so I have probably forgotten some critical pieces in the ASL pjsip.conf settings.
zBitx QRP HF transceiver
I’ve powered up this small SDR radio by HFSignals but I haven’t yet attached a monitor, keyboard, and mouse to configure it for my use. I intend to make a compact HF station that can live under the seat of my pickup truck. This is also why I’m experimenting with simple, collapsible vertical antennas (see next). For hands-on introductions to various aspects of the zBitx, check out a YouTube playlist by Vince VE6LK. Next up for me is configuring the radio and updating it.
JPC-12 antenna
I bought a cheap vertical antenna system. Actually, I bought three different systems, but one is incomplete and one is delayed somewhere between the United States and the country of origin. Why three? The mantra “two is one and one is none” was in my mind as I spent money!
Two is One, One is None: A Discussion on Redundancy
Redundancy is the duplication of critical components or functions of a system with the intention of increasing reliability of the system, usually in the form of a backup or fail-safe.
Amazon reviews on this antenna are pretty positive. I also found an online review that seemed balanced and objective, pointing out the strengths and weaknesses of the JPC-12 antenna. Knowing full well it isn’t a perfect system, I purchased this one from Amazon:
JPC-12 HF Antennas for Ham Radio with Slide Regulator 7MHz-50MHz All Band Hf Vertical Antenna 40m-6m 8 Bands for Outdoor 4.1 Meter(13.5Ft) (M10) (this is an affiliate link)
Earlier, I had purchased the Radioddity HF-009 antenna system. This package is somewhere between the country of origin and my doorstep.
I haven’t assembled the JPC-12 yet. Unzipping the included carrying case reveals the nicely organized pieces:

(A few hams have suggested that I’ll want a 1:1 unun to prevent stray RF from coming down the shield and into the radio. I’m looking at the LDG RU-1:1 Unun. Got advice? I’m sure I’m not alone in wanting to hear opinions and experiences about using a choke on this antenna!)
I also bought some new coax and a BNC-to-SO239 adapter so that I can use this antenna with my zBitx transceiver.
I had previously purchased a product from AliExpress but it was taking so long to arrive I went ahead with the JPC-12 purchase. Here’s the AliExpress item:
Unfortunately, the AliExpress system arrived without a ground spike in the package. Fortunately, though, the JPC-12 ground spike fits the AliExpress unit. This is two-is-one-and-one-is-none in practice!
Seeed Studio reRouter CM4
I’ve pulled the reRouter CM4 out of the package and booted it up. It is pre-loaded with OpenWRT which ran beautifully on the network I was using. What I hope to do is replace the OpenWRT system with either Debian 12 or the AllStarLink 3 Appliance software. I don’t know that the ASL3 Appliance package will install on a device based on a Compute Module 4 CPU, but it’s worth a try.
It’s a really nice little unit. If my experiment with AllStarLink fails, I’ll look at using the device with OpenWRT on my sister’s LAN or as a travel router.
Cordless soldering iron
I’ve been wanting to try a small, cordless soldering iron for some time. I chose this one based on reviews and the low price. I haven’t used it yet but I’m hopeful that for occasional light work, it will do the job.
Cordless Soldering Iron Kit, Rechargeable USB-C Soldering Pen with OLED Screen, Portable Battery Powered Solder Iron for Electronics Repair, Includes 3 Tips & Lead-Free Solder Wire (this is an affiliate link)
I also bought extra soldering paste (flux) but when the soldering iron arrived, it included a small jar of flux, making this an all-in-one kit.
W0AEZ batteries
My extended batteries by W0AEZ for my Yaesu FT-5DR and Kenwood D74 handheld radios have arrived but I’ve not yet charged them or fitted them to the radio bodies. I’ll have some pictures for you next week. A big reason for buying these, besides the additional capacity, is they charge over a USB-C connection. That works for me, especially when I’m traveling.
Following up: Audio out of my tiny AllStar node
Pryme speaker-mic is my choice
My tiny AllStar node built around a Raspberry Pi Zero 2 W and an AllScan URI90 sounds different, depending on the brand and model of K-1 speaker-microphone I use. Which one sounds the best? The best sounding speaker-mic is by Pryme:
PRYME® SPM-601 Synergy™ High Perfomance Mid-Size Speaker Mic w/3.5 Earphone Jack with 2-Pin Plug (Compatible with Kenwood, Baofeng and Wuoxon Radio Models) (this is an affiliate link)
I have one more K-1 speaker-mic to test but that will have to wait until I can retrieve it from my QTH.
An inexpensive mobile speaker also sounds great
I also looked at alternatives to the Icom mobile speaker I’ve been using (which sounds great, by the way) with the node. I ran across a suggestion on Reddit for this inexpensive speaker:
QWORK 5W External Communications Speaker - 2 Pack 8 Ohms with 3.5mm Plug for Ham Radio, CB, and Scanners, HF Transceivers- Black (this is an affiliate link)
Two speakers for less than $20? I was pretty skeptical, but the Redditor’s replies to others expressing similar disbelief were firmly on the positive side. The Amazon reviews averaged 4.7 stars, which seems high for a cheap speaker. Nevertheless, I gambled and bought a set.
The QWORK speaker is a little larger than the Icom speaker, and a little lighter in weight, too.
 and Icom speaker (right)")
Color me surprised that these speakers sound just as good as the Icom speaker, and maybe even a little bit better. They have a brighter, crisper tone, compared to the Icom speaker. That brighter tone makes voices easier to hear and understand, at least for me.
I don’t suggest using these cheap speakers in a harsh environment, but for a desktop or shelf, they seem perfectly fine. (This means I can put my Icom speaker back into the pickup truck where it pipes the audio from my Yaesu FTM-300DR mobile radio to just behind my headrest.)
Thoughts
AllStar and M17
I love the smoothness and natural sound of analog voice transmissions, even with static and interference present. I suppose it’s a bit like listening to an original vinyl record: despite the hiss and pops, the audio just sounds more natural and true.
At the same time, I like the exceptional clarity of digital voice comms, at least when the signal is strong and clear (digital voice fades very differently than does analog voice). The differences are real, even if I can’t adequately describe them. As my hearing changes over time, the clarity achievable with digital voice becomes more and more attractive.
While AllStarLink is (says Google) “primarily designed to link analog FM (Frequency Modulation) repeaters and hotspots over the internet, and therefore involves aspects of both analog and digital technologies,” M17 is digital from the transmitter to the repeater/reflector/hotspot and the receiver.
They are different, so why do I like both of these platforms? AllStarLink and M17 share one very important characteristic: they are both open source projects.
Says AllStarLink.org:
And says the M17 Project:
AllStar is a mature project. M17 is not. When you use AllStar, it’s easy to appreciate what dedication by a team of people, investing hard work over several years, can produce. When you use M17, you may encounter some unexpected behaviors, simply because the team is small and the tech is still so young.
I encourage you to support the M17 Project. They deserve a chance to continue innovating and building a completely open source system for amateur radio. M17 may not be perfect, but it is currently the only widely deployed, open source radio system (where system means all of the software and hardware) in use by the amateur radio community. Let’s give it time to mature. If you feel so inclined, you can also give some of your treasure or talent to help them along.
What I write about
More than 100 hundred new subscribers have joined the Random Wire community in the past week, for which I am very grateful. At the same time, our new community members probably don’t know what I write about.
I named this newsletter the Random Wire because my interests are often, well, somewhat random! I like modern digital modes and old analog transceivers. If those old radios have tubes in them, that’s even better. I spend a lot of time with AllStar because the audio quality is amazingly good and there are many ways to craft and use an AllStar node…including not having a node at all. I also use Yaesu System Fusion, D-STAR, and DMR modes and radios.
I’m not an electronics whiz by any stretch of the imagination and my soldering skills are poor…and I’m being generous when I say that. I can assemble things but designing them or following a schematic falls outside my skill set. There are days when I just want to use a radio like a toaster: plug it in and flip the lever. Other days I want to take the cover off to make sure the capacitors on an old radio aren’t leaking (and maybe to better see the glow of the valves).
I want to learn Morse Code, and by saying that, now you know I’m a radio amateur who did not have to pass the code test.
I like learning new things and I tend to learn by doing. My mantra — touch a radio every day — is how I keep discovering things that work and things that don’t work. I make a lot of mistakes, and mistakes often make the very best lessons.
In short, I think I’m a lot like many of the people who subscribe to the Random Wire: hams fiddling around with radios, modes, antennas, and building.
What I write about varies week to week because I wander randomly around our vast, complicated, interesting hobby. If there are topics you’d like to explore with me, please start a conversation. Similarly, if there are topics that don’t provide value for you, please let me know.
Above all, thank you for subscribing and traveling this meandering path with me!
73 to all. Remember to touch a radio every day!

Compared to a Raspberry Pi 4, I said, "The value-oriented alternative is an RPi 3B+ single board computer." I should have added that a Dell Wyse 3040 miniPC is also a fantastic value proposition. They are reliable, small, inexpensive, and perform well with AllStarLink.
Thanks for a great education on RPi hardware. The elimination of the SD card removes a source of reduction in reliability of the RPi. SD cards often become corrupted!