

Random Wire 144: W0AEZ batteries, stealthy HF antennas, and another Raspberry Pi case
August 15, 2025: I've put an extended battery by W0AEZ into service on a Yaesu FT5DR, and tried three different portable antennas with a Kenwood TS-50S transceiver.

Top of mind

W0AEZ batteries
Extended batteries by W0AEZ for my Yaesu FT5DR and Kenwood TH-D74A handheld radios have arrived. I’ve charged them up and am using the FT5DR. A big reason for buying these, besides the additional capacity, is they charge over a USB-C connection. That is a big convenience for me, especially when I’m traveling. When using it with my hotspot, I can leave it on all day long and still have plenty of juice available for a long conversation.
With the W0AEZ battery, the FT5DR is a chunky thing. I got it in the tan color so it would be immediately evident to me that this wasn’t the stock battery. The photos below illustrate how big it is. (Please pay no attention to the color of my hand — I have no idea why the skin color is so far off.)

The side view demonstrates just how thick is this battery pack. Because it protrudes so far and has a fair amount of heft to it, the radio sits well on a desktop.

This view compares the stock battery (installed on the radio) to the W0AEZ battery:

Charging is through a USB-C port in the bottom of the battery. I think it would be a good idea to find a USB-C plug to help protect that connector. Perhaps something like this:
USB C Dust Plug Silicone USB C Anti Dust Port Cover Type C Charging Port Protectors Plug Compatible with iPhone 15 Pro Max Plus Samsung Galaxy Google Pixel and All USB Type C Ports (this is an affiliate link)
(I did buy some silicone USB-C plugs and used two on my laptop to help keep crud out of those very important ports.)
I do wish the USB-C connection was on the back of the radio instead of the bottom. That would allow recharging with the radio standing up if the cradle isn’t handy.
So far, the batteries are working very well. I’ll continue to use them to see what kind of operating life I can get.
Stealthy HF antennas
GRA-750B antenna
Last year, I bought an antenna to use on the pickup truck (portable, not mobile):
GRA-750B 7-56MHz HF HOA Stealth Antenna, Mobile Antenna, 120W(SSB), 40W(FM), 48.03 inch, PL259 (this is an affiliate link)
And I got a tri-mag mount to use with it:
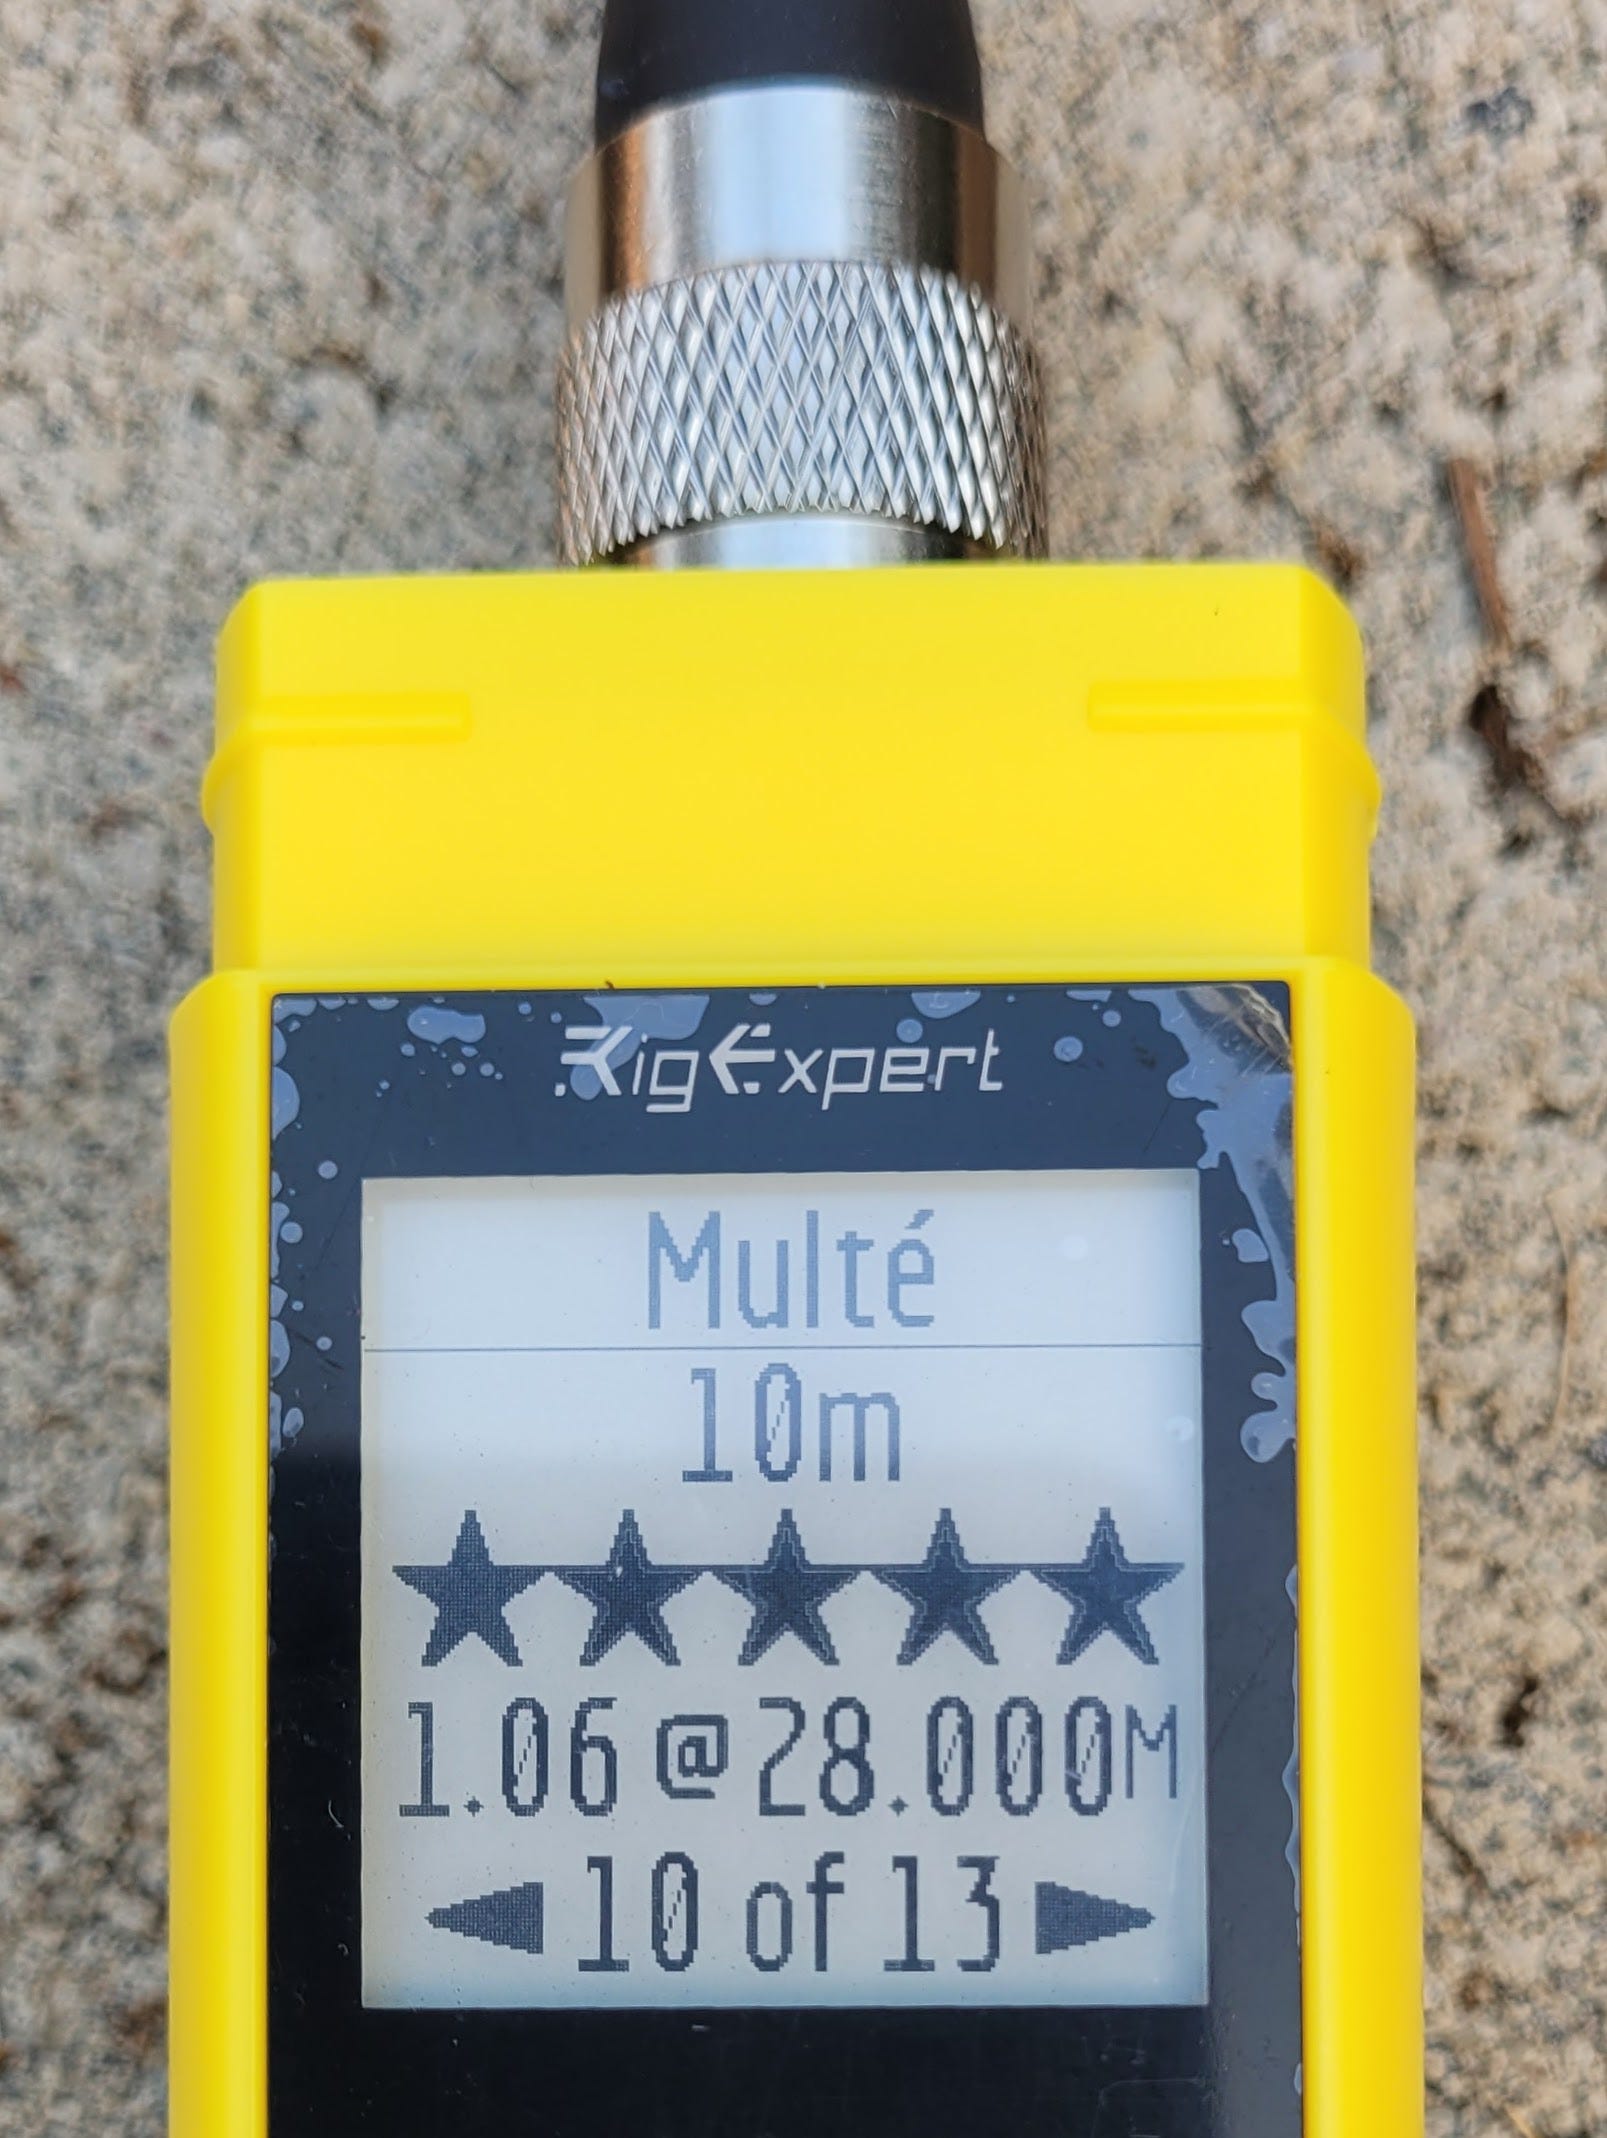
I was pleased when I tested it this week, finding very low SWR numbers for 10, 12, 15, and 17 meters. SWR began to climb slightly at 20 meters (SWR 1.33) and was near 1.5 for 40 meters. I’m pretty thrilled by those numbers.
My plan was to acquire a few small HF transceivers, so along the way, I’ve picked up some Ten-Tec radios, a Kenwood TS-50S radio, and an HFSignals zBitx radio.
More recently, I bought a few systems featuring a telescoping vertical and a ground spike.
JPC-12 HF antenna from Amazon
Amazon reviews of the JPC-12 antenna are generally positive. I also found an online review that seemed balanced and objective, pointing out the strengths and weaknesses of the JPC-12 antenna. Knowing full well it isn’t a perfect system, I purchased it.
JPC-12 HF Antennas for Ham Radio with Slide Regulator 7MHz-50MHz All Band Hf Vertical Antenna 40m-6m 8 Bands for Outdoor 4.1 Meter(13.5Ft) (M10) (affiliate link)
I tried the JPC-12 this week and enjoyed good reception on several bands. I was unsuccessful at transmitting. More on this in a moment.

Radioddity HF-009 antenna
A new Radioddity HF-009 antenna system arrived last week. I set this up to try it with a 10-meter net my local amateur radio club enjoys every week. Like with the JPC-12 system, reception was good but my transmissions were not heard.

For the net, I tried all three antennas and with all three, I experienced decent reception but was unsuccessful with transmitting. Here is my quick-and-dirty setup:

I have more testing to do. For tuning the antennas, I used a RigExpert Stick 500 Antenna Analyzer from GigaParts to make sure the SWR was acceptable. I was also using a new-to-me radio, a Kenwood TS-50S transceiver (see here and here for more information about the TS-50S) which I ran at 50 and 100 watts.

Most likely, I don’t have the radio set up correctly. Nevertheless, I’m going to set up an RF output meter to see if the Kenwood is sending RF to the antenna when I key up. It acted like it wasn’t, making me wonder about the finals in the radio. I’ve got the meter for the testing — I just need to find the time and bench space to test!
Kenwood MC-45D speaker-mic and the Pryme speaker-mic
I did finally get to try the Kenwood MC-45D speaker-mic with my tiny AllStar node built around a Raspberry Pi Zero 2 W and an AllScan UCI90 speaker-mic interface. It sounds just as good as the Pryme SPM-601 speaker-mic I mentioned last week, at least to me. I find that I prefer the Pryme speaker-mic because the cord is a bit thinner. It just seems to fit the tiny node better than the Kenwood speaker-mic with its heavier cord. The Kenwood MC-45D is going to be a perfect companion for my Kenwood TH-D74A handheld.
My choice for the best all-around speaker-mic for the AllScan UCI90 is the Pryme:
PRYME® SPM-601 Synergy™ High Perfomance Mid-Size Speaker Mic w/3.5 Earphone Jack with 2-Pin Plug (Compatible with Kenwood, Baofeng and Wuoxon Radio Models) (this is an affiliate link)
Of course, either the Pryme or the Kenwood speaker-microphones will be great choices!
Another Raspberry Pi case
I wanted to try a brand different than Argon 40 (which I like very much). I selected the DeskPi Lite by DeskiPi.com for a Raspberry Pi 4B. My first impressions? The case is lightweight but feels sturdy. It is very well ventilated and the cooling fan is quiet. I like having almost all of the ports at the rear of the case, and an illuminated power button on the front.

At about $30, this slick-looking case is also affordable:
GeeekPi DeskPi Lite Pi 4 Case with Power Button/Heatsink with PWM Fan/Dual Full-Size HDMI/Extra Two USB Port for Raspberry Pi 4B (this is an affiliate link)
The user manual is lacking. It has incomplete information or information is missing. For example:
On page 3 of the tiny manual, only two connectors on the expansion board are shown connecting to the Raspberry Pi 4 single board computer, but in reality, there are four physical connections (one USB-C, two microUSB, and the TRRS plug).
On page 5, each screw that secures the base has an arrow pointing to where it goes, except there is an arrow that has no screw associated with it.
The small diffuser lens for the status LEDs has to be placed before placing the RPi and expansion board in the case, but this is neither mentioned nor shown anywhere in the instructions. The diffuser is not symmetrical, so carefully examine how the case will fit together after positioning the it in the case.
Only one thermal pad is indicated in the manual for placement, but the other thermal pads fit on other chips and modules on the RPi 4B, and the fan board fits perfectly when those other pads are fitted.
The DeskPi Lite case is all plastic, sturdy, and very well ventilated. (In fact, it seems to be running cooler than the system I built last week in the Argon ONE M.2 case.) It features two full-size HDMI ports and adds two USB ports. All ports are on the back of the case except for the two additional USB ports. The two full-size HDMI ports are created through the use of an expansion board.
Here is the official description:
The DeskPi V1 Case is a case made of ABS, and an adapter board is provided inside to transfer the HDMI interface, 3.5mm audio interface, and USB-C power interface of the Raspberry Pi to the back of the panel. and offer
microHDMItoFull-sized HDMIinterface, makes it convenient for users to use standard HDMI cables to connect external display devices. In addition, it provides an ultra-thin aluminum alloy heat sink and supports an adjustable-speed ultra-thin silent fan, which can be safely cut off Power supply for Raspberry Pi by sending a "power_off" signal to the adapter board.
I went into the raspi-config routine in the terminal to enable fan control and set the temperature at which the fan is turned on and off.
How do the three builds look, side by side? On the left is the Argon ONE M.2 case, in the middle is the DeskPi Lite case, and on the right is the Argon NEO NVMe case with an Raspberry Pi 5 inside.
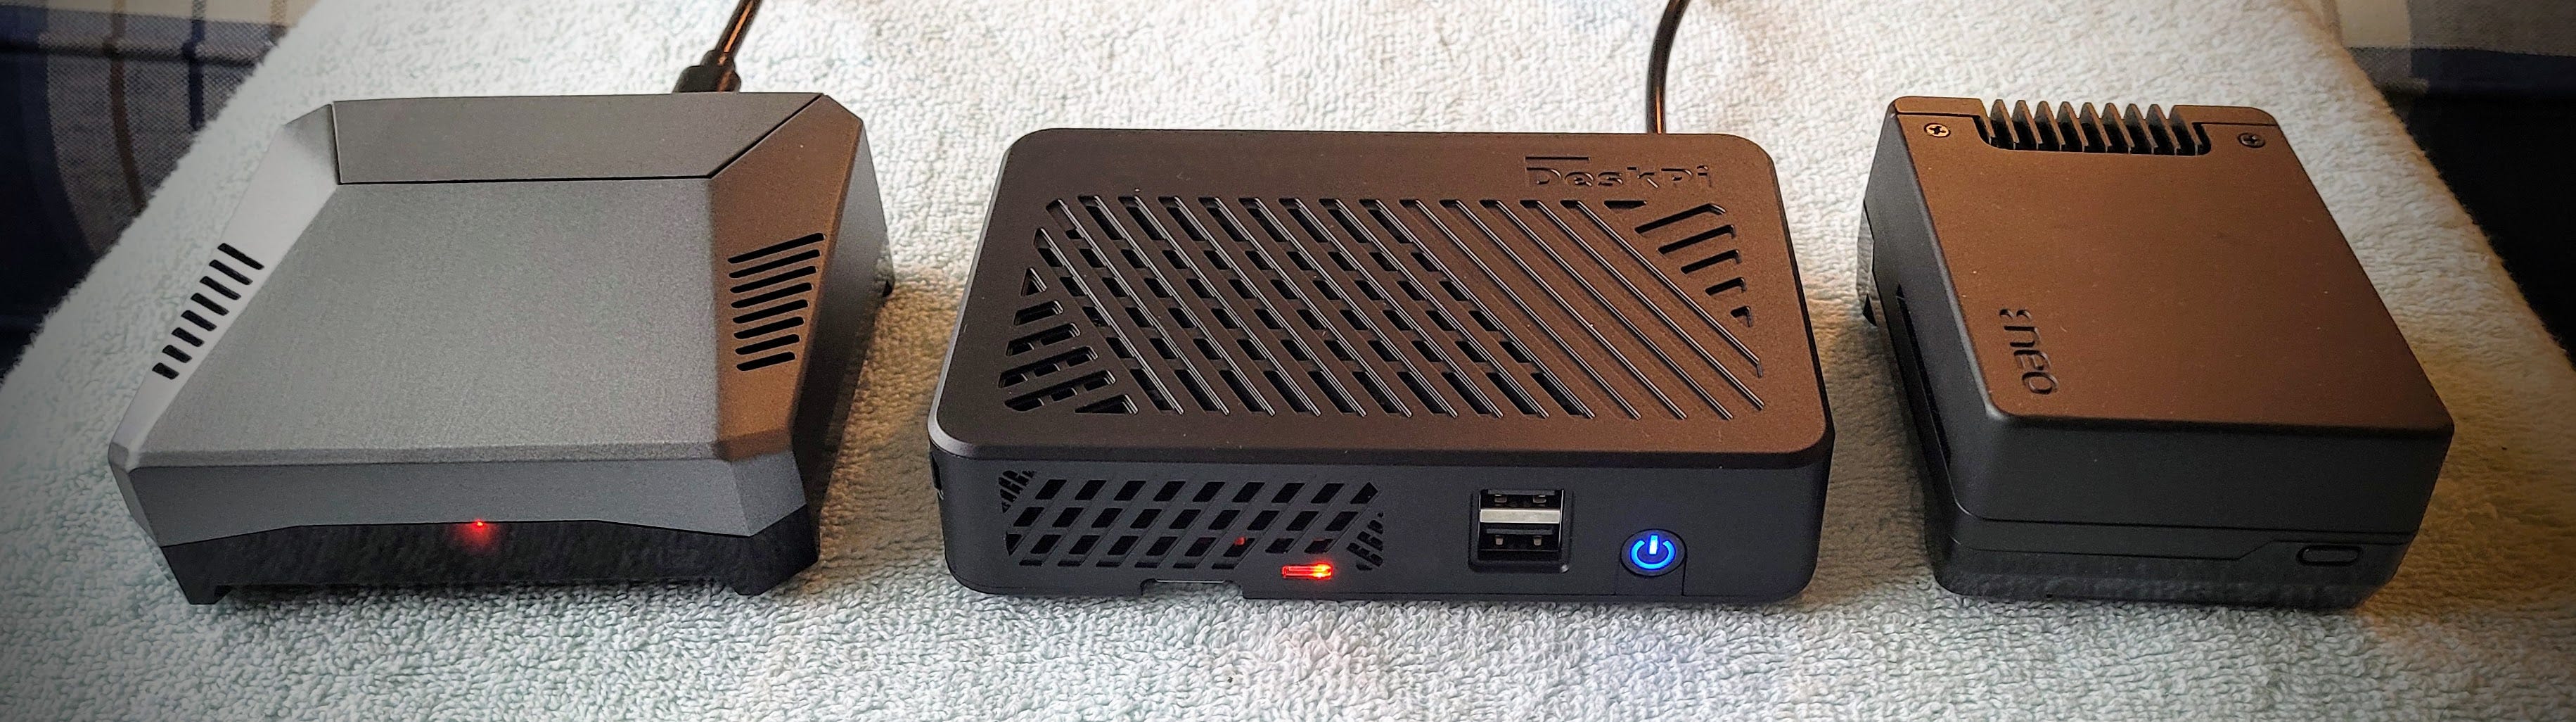
The two Argon cases have mass storage drives (SSD in the Argon ONE and an NVMe drive in the Argon NVMe). The DeskPi Lite has a 64-Gb microSD card inside. I chose a different microSD than usual: a SanDisk High Endurance Card:
The two-pack was about $25. An individual 64-Gb High Endurance card is $10.99. A 32-Gb High Endurance card is $9.99. The price difference was so small I felt comfortable going with the bigger card.
Of greater significance is whether “high endurance” means anything beyond marketing hype. I found a review at https://ripitapart.com/2019/08/17/unboxing-and-review-of-sandisk-64gb-microsdxc-high-endurance-card/ that details quite a bit of testing by that author but by the end of the review, I can’t tell if the card is any better than other choices. I’ll see how it fares as time goes by.
The arrangement of ports on the DeskPi Lite is convenient if you’re going to put this on a desktop or shelf. They are perhaps less conveniently located if you would use the DeskPi Lite as a development platform. I like having the status indicator and the power button on the front panel, and having a fan helps keep the system cool. If you want or need mass storage other than a microSD card, consider the DeskPi Pro which can use a solid state drive (SSD) for storage.
Mystery: an unresponsive PC
“POP,” went my computer, and my computer screens went dark. When I heard that sound, I thought: that’s not good.
I have an old and well-loved Dell OptiPlex 7050 computer on my desk. It is plenty powerful enough for my business uses, with 32 gigabytes of RAM, a 1-terabyte SSD, and an i7-7700 CPU. Several weeks ago, I was using the computer when I heard a distinct “pop” and my two screens went dark. I didn’t smell anything out of the ordinary, so I figured I had not blown a capacitor.
It’s probably the power supply, I said to myself
I followed some Dell-provided directions to reset the computer but still got no response from it. Popping the lid, I unplugged the power and then plugged it back in. I heard no sounds and saw no lights. I didn’t have a multimeter handy to check for AC power to the computer, or DC power from the power supply. But with no lights, no hum, no fan, my guess was the power supply had failed.
Since I recently re-seated the CPU, I decided to clean that up and seat it once more. I removed the fan shroud and the cooling fins, then cleaned off the old thermal paste, and finally removed the CPU for final cleaning and inspection. I looked for bent pins on the CPU and motherboard but didn’t see anything that looked wrong. (Tip: if you use reading glasses and don’t have a higher-power magnifier available, put another pair of readers over the pair you are wearing to double the magnification. It looks odd but it works pretty well in a pinch.)
While I had the cover off, I also carefully inspected every visible capacitor on the motherboard. Finding no blown caps, I reinstalled the CPU, applied fresh thermal paste to the top of it, and put everything back together. Crossing my fingers, I plugged in the power and pushed the power button. Nope, nothing. No lights, no hum, no fan.
Time to go with my original thought and try another power supply. I looked on eBay and found one from a well-rated seller for $6.99…plus $10 for shipping, plus state sales tax since I was taking delivery in Washington State. Total cost: $18.45. It arrived about a week later.
Replacing it was almost a tool-free affair. I had three screws to undo on the end of the power supply, but all of the other securing slots and tabs did not require tools. I had the old power supply out in about five minutes and the new one in and the cover back on the PC in another five minutes.
And then arrived the moment of truth. I plugged in the PC, crossed my fingers, and hit the power button. The disk drive light started blinking and the machine booted. I’ve rebooted it a couple of times since then. I have a temperature monitor running, too, just in case the CPU was overheating and causing the machine to reset. It’s been running continuously now for a week with no warnings or hiccups.
I hope I’m not jinxing it when I say it looks like the repair worked! For less than $20, my old PC is happily plugging along again.
MMDVM reloaded

I spent some time trying to convert one of my original hotspots from MMDVM Pi-Star to WPSD, to no avail. Booting from the WPSD image failed sometime before networking was established, so there was just no way to connect to the device.
The RPi board is too old and limited to function with WPSD. From the WPSD FAQs:
Is the original Pi Zero W (single-core, first generation v1.1) supported? No. It’s from 2015 and is too slow to support the feature-rich nature of WPSD. You can perform an inline replacement with a Pi Zero 2W with no additional configuration. Don’t ask for support for this model – upgrade to a better, more modern SBC.
When I put the original microSD card back in, it booted right up and connected to the network over Ethernet and over wifi. Then I reinstalled Pi-Star (using the most recent download available), and that went perfectly well.
While I wanted this particular hotspot to work with WPSD, it didn’t, so I’ll keep it running Pi-Star. It sits in my Olympia office which means I only use it occasionally, so Pi-Star will continue to serve well for Yaesu System Fusion and DMR.
However, this also means I’m looking at some upgrade options, including looking at components for a newer hotspot build.
AllStarLink: show version
File this away against the time you need to know what versions of AllStarLink software you are running. Note that everything in this section is for AllStarLink 3 on a current Raspian or Debian 12 system. Use the published commands at your own risk.
Here’s the command to run in a terminal window:
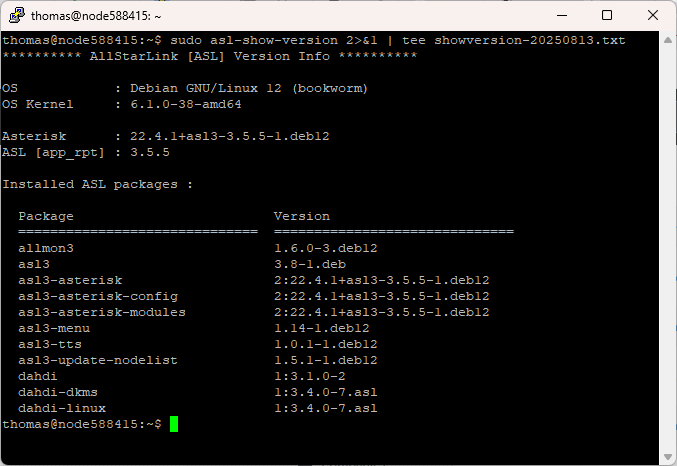
sudo asl-show-versionI just updated my node 588415 a few minutes ago, then ran asl-show-version. Here’s the output:
********** AllStarLink [ASL] Version Info **********

OS            : Debian GNU/Linux 12 (bookworm)
OS Kernel     : 6.1.0-38-amd64

Asterisk      : 22.4.1+asl3-3.5.5-1.deb12
ASL [app_rpt] : 3.5.5

Installed ASL packages :

  Package                         Version
  ==============================  ==============================
  allmon3                         1.6.0-3.deb12
  asl3                            3.8-1.deb
  asl3-asterisk                   2:22.4.1+asl3-3.5.5-1.deb12
  asl3-asterisk-config            2:22.4.1+asl3-3.5.5-1.deb12
  asl3-asterisk-modules           2:22.4.1+asl3-3.5.5-1.deb12
  asl3-menu                       1.14-1.deb12
  asl3-tts                        1.0.1-1.deb12
  asl3-update-nodelist            1.5.1-1.deb12
  dahdi                           1:3.1.0-2
  dahdi-dkms                      1:3.4.0-7.asl
  dahdi-linux                     1:3.4.0-7.asl
I went ahead and saved a copy on node 588415 as showversion-20250813.txt. That is easily done by redirecting the routine’s output to a text file, like this:
sudo asl-show-version > showversion-20250813.txtOr, if you’d like to see the output on your screen and write it to a file:
sudo asl-show-version 2>&1 tee showversion-20250813.txtIt looks like this:
And for those who want to keep a running record of versions, you could consider creating a showversion.txt file and appending to it each time you run sudo apt upgrade. To do this, you use not one but two redirect symbols:
sudo asl-show-version 2>>&1 tee showversion.txtThe problem with this? No timestamp on the entries. For that, you run this first:
sudo echo "$(date '+%Y-%m-%d %H:%M:%S')" >> showversion.txtThat string will append the current timestamp at the bottom of the file, and then when you run asl-show-version, the timestamp will be just above the latest version information.
Let’s put this all together in a simple bash script (I know it can be made more elegant by nesting commands but this script has the benefit of making each step explicitly clear):
#!/bin/bash
# This records the current timestamp then adds version info below it
# First get the date and add it to showversion.txt
sudo echo "$(date '+%Y-%m-%d %H:%M:%S')" >> showversion.txt
# Then get version information and add it to showversion.txt
sudo asl-show-version >> showversion.txt
# Then add a blank line to make the appended output easier to read
sudo echo "" >> showversion.txt
# Then print the current version output information to the screen
sudo asl-show-version
If you do create this bash script, be sure to make it executable by root:
sudo chmod +x showversion.shPutting sudo commands inside the bash script is a bit clunky. You could remove those and run the script as root:
sudo sh showversion.shI chose to include the sudo commands. If you are logged in as your normal user and run sh showversion.sh, the system will prompt you to for your password and the script will run normally. If you are already authenticated for sudo, then the script will still run normally.
I find it a bit of a comfort to be able to see what version changes an upgrade has made. This is one way to record that information, just in case.
I also saved a copy of showverssion.sh by sending it from my node to my desktop PC over my tailnet:
sudo tailscale file cp showversion.sh [name of PC on my tailnet]:Finally, if you want to get in the habit of doing this when you update/upgrade, you can run multiple commands in one string in the terminal or over an SSH session, like this:
sudo apt update; sudo apt upgrade -y; sudo sh showversion.shFind the asl-show-version command and other command-line tools at https://allstarlink.github.io/user-guide/asl-cmds-tools/.
If you want to know what was upgraded in your most recent upgrade, issue 104 of the Random Wire has you covered.
ASL: Are you an appliance operator or DIYer?
I think there are a lot of us who just want to turn our amateur radio device on and know it will work…like a toaster just works. I’ve heard some folks who like to build their own gear speak derisively about “appliance operators,” but let’s face it: sometimes that’s all you want or need.
AllStarLink can work for folks who just want something to run like a toaster. You can buy your node already configured. (Thank you, AllScan.info and Kits4Hams for providing some products that will be plug-and-play when you receive them). I’ve done that and my experiences with both vendors was great. It is a wonderful feeling to receive a new device, plug it into the network, power it up and it just works.
But when something goes wrong with an AllStar node, well, now you’re in do-it-yourself territory. I have read many comments in various forums by hams who are frustrated that they can’t figure out how to fix their node. Sometimes, it becomes a hair-pulling, frustrating event. Fortunately, there is a lot of experience with AllStar available online, so as long as you’re not afraid of diving under the hood once in a while and asking for help, AllStar is a great way to access the world and experience great audio.
If you’ve been holding back from diving into the AllStar pool, or just want an appliance, now is a great time to get involved. Plenty of guides and community help are available. I look forward to hearing you “on the air” on AllStar.
Personal note
It’s been a wild week. My spouse was transferred to an in-patient rehabilitation (IPR) facility at the end of last week. We’ve been adjusting to the new people, location, food, schedules, and systems. My commute time jumped from an hour each way to nearly 90 minutes, and if traffic interferes, it can take more than two hours…like it did twice this week.
I know it sounds like I’m complaining, but I’m actually very happy my wife is in IPR. I fought hard to get her this more intensive treatment. She’s getting three solid hours of therapy a day and seems to be responding well. We’re both learning a lot, so even if her progress stalls, we are being armed with more information.
I am thankful for my amateur radio friends. I’ve been on the air almost every day this week during my commute. Most folks don’t know what happened to my wife, and I’m fine with that. Just being able to talk with like-minded people is helping me cope.
And with that, I’ll say 73 to all. Remember to touch a radio every day! This is KJ7T, and I’m clear.

Tom - Thanks for your continued tutorials and advocacy of AllStarLink. It's taken me a while to fully grasp where ASL fits into the greater Amateur Radio Over Internet ecosystem(s). I've learned a lot over the past few months and getting online with ASL for extended conversations with folks like you that are out of "simplex or local repeater" range, is now in the queue. (Admittedly, it's down in that queue a bit given ZRDC 2025 and other more urgent projects in N8GNJ / Zero Retries Labs.) And, great news on your wife's getting IPR.