

Random Wire Review 136: Two handheld duplex radios — one old, one new. ASL Cockpit installed on Debian 12 machine. Changed the frequency on full-duplex ASL node. Speculation on ASL node platform.

Something old, something new
RWR 136 focuses on two full-duplex handheld radios. One is a classic that went out of production in the early 2000s. The other is a modern handheld that entered production in the summer of 2022.
 and Radtel RT-880 (right)")
Something old: Icom IC-W32A duplex handheld
I rolled the dice on what looks like a very filthy Icom IC-W32A handheld radio from an eBay seller. It is clear the seller is not a licensed radio amateur, so my confidence level that the device works properly is rather low.
I expect the IC-W32A to arrive right around the time this newsletter is published. It’s going to need cleaning. My plan is to use a microfiber cloth and compressed air for the initial cleaning.
UPDATE: The IC-W32A arrived this week in Portland, Oregon. I made a trip to Portland on Friday (today!) and with a fresh battery, the radio turns on and receives on both VFOs. I’ve not tried transmitting with it yet. As the photo above shows, a new Radtel RT-880 (without GPS) also arrived. (This is *not* the Radioddity GD-88 I write about below!) I had just enough time to charge it and make sure it powered on. I’ll report more on both radios next week.
The battery and charger (procured through Amazon) have already arrived. The radio platform is not so old that the battery is a NiCad. Instead, it uses the next evolution in battery technology from that era: nickel-metal hydride. If you haven’t used NiMH batteries before, it’s important to treat them properly.
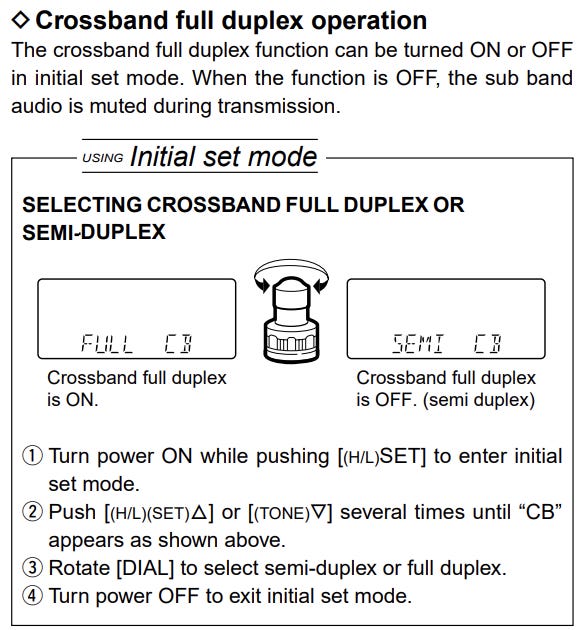
My hope is that with a little cleaning, and the new battery and charger, this venerable old platform will work fine in full duplex with my AllStar node. Since my full-duplex node receives on UHF and transmits on VHF, I think the cross-band full-duplex setting on the IC-W32A should work.
Something new: Radioddity GD-88 full-duplex handheld
After receiving some information from a subscriber (thank you, Brian!) I bought another radio. He suggested that the Radioddity GD-88 radio was probably a full-duplex handheld. I read the vendor information and dug around for reviews, finding these sources:
Volume control on this radio is a problem, according to some reviews. The GD-88 gets a 3.8 rating on Amazon with mixed reports on several aspects of the radio.
Clearly, the radio functions in duplex for DMR, where you can transmit on one time slot and receive in the other VFO on the other time slot. But will those two VFOs work the same way in analog? Will I be able to transmit on one frequency and simultaneously receive on a different frequency?
The most influential review, for me, comes from Andreas M0FXB in 2022. He reviewed the Kytera RD-88. The Radioddity GD-88 is a rebranded Kytera RD-88. Andreas calls it “two radios in one.” His nearly 10-minute video from 2022 shows it in action:
Andreas has produced several helpful videos about the GD-88 radio. Find them with this search on Google (https://www.google.com/search?q=youtube+m0fxd+gd-88) or this search on DuckDuckGo (https://duckduckgo.com/?t=h_&q=youtube+m0fxb+gd-88&ia=web).
By the way, the third-party code-plug editor noted in the video is by David MM7DBT: https://www.cpeditor.co.uk/. This screenshot of his web page gives a glimpse of how polished his editor is:

My GD-88 radio package was $179 (but if you want a $15 discount, use my affiliate link to shop):

The eBook looks to be a well done “primer” on Digital Mobile Radio. Here’s the table of contents:

I also bought a programming cable on Amazon:
This particular cable also works with the Retevis RT-85 handheld radio, of which I have, well, several. (It’s always nice to buy one thing that works with more than one thing!) Since Andreas M0FXB produced that YouTube video in 2022, a couple of firmware updates have been made available by Radioddity:

The most recent update is the February 10, 2025 package announced at https://www.radioddity.com/blogs/all/radioddity-gd-88-db25-d-new-firmware-cps-release
Is the GD-88 as polished as the Anytone AT-D878UVII+ radio? No. I have an 878 and enjoy not only the quality of the radio but also that most of the bugs have been worked out. However, I do like to tinker so knowing there are some rough edges on the GD-88 radio doesn’t really put me off buying it. The GD-88 is a unique radio, with two independent VFOs, i.e.: “two radios in one.” I’m excited to try this with my duplex AllScan ANF101 AllStar node. It was shipped this week, so I’ll be playing with it sometime next week.

Wo-We mini PC with AllStarLink 3
The inexpensive Linux computer that arrived last week is running. When I booted it for the first time, it booted into Ubuntu Linux. Instead of configuring the Ubuntu instance, I immediately installed Debian 12. I expected this to go smoothly because Ubuntu and Debian are closely related, and indeed, the installation went well.
Installation of Deb 12 was speedier than when installing on a Dell Wyse 3040. Once installed, the responsiveness of the desktop environment appears to be about the same as with Deb 12 on the 3040 platform, but the responsiveness of text-based commands in the terminal seems faster. Based on this very early, qualitative assessment, my guess is the Wo-We computer might run AllStarLink 3. The only way to test that is to install it, so I did.
First, though, I installed several packages:
xrdp, so I can use Remote Desktop Protocol on my Windows computer to operate the Wo-We computer remotely.
Tailscale, to provide a convenient tunnel between my laptop and the Wo-We computer.
ufw, to lock down all ports except the ones I absolutely need.
I installed ASL 3, Allmon 3, and Cockpit. Cockpit runs fine with one error: smartd can’t find any drives to monitor. The is reflected in the “1 service has failed” message in the Cockpit overview screen:

The system seems to idle at around 60-65% CPU utilization. That is higher than I’d like but probably still workable for ASL3. I’ll let it run another 24 hours and then pull another report.

Here’s a summary of one hour of idling:

A few notes on installing Cockpit
Installing the Cockpit web-based administrative interface on this Debian 12 instance was easy.
Step 1: Install the repo
I had already done this as part of installing AllStarLink 3. If you haven’t done that, here’s how:
cd~
wget https://repo.allstarlink.org/public/asl-apt-repos.deb12_all.deb
sudo dpkg -i asl-apt-repos.deb12_all.deb
Again, if you’ve already done this as part of the ASL3 installation process, you don’t have to do it again.
Step 2: Update the package list and install
Update the package list and then install Cockpit:
sudo apt update
sudo apt install cockpit -y
Step 3: Enable and start the Cockpit service
sudo systemctl enable --now cockpit.socket
sudo systemctl start cockpit
Step 4: Verify the install, allow through the firewall
This assumes that you are using the Uncomplicated Firewall (ufw).
sudo systemctl status cockpit
sudo ufw allow 9090,80,443/tcp
sudo ufw reload
sudo ufw status
That should do it. There are other packages you could try if you wish but I have not done so.
sudo apt install cockpit cockpit-networkmanager cockpit-packagekit cockpit-sosreport cockpit-storaged cockpit-system cockpit-ws python3-serial firewalldErrors
The storage in the Wo-We machine is at /dev/mmcblk0p2 which is not recognized by smartd, even when I manually configure it in /etc/smartd.conf. This error shows up in Cockpit and I haven’t figure out how to resolve it yet:
Failed to start smartmontools.service - Self Monitoring and Reporting Technology (SMART) Daemon.However, this doesn’t seem to impact how the Cockpit system functions overall, so I disabled smartmontools:
sudo systemctl disable smartmontools.serviceLater, I got an error at reboot, saying asl3-boot-oneshot.service failed to start. I checked the status of the service and it is enabled but fails:
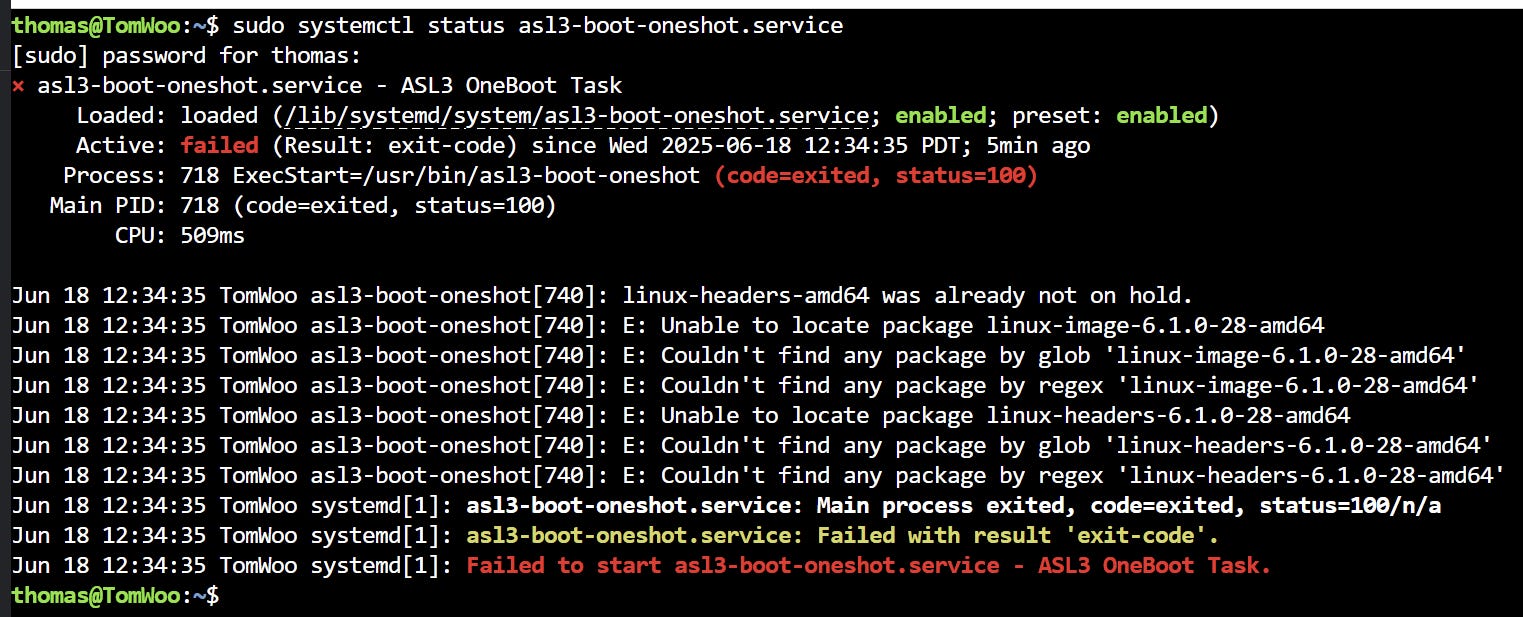
After doing a bit of research, a fix for this error appears to be “in the works” (see: https://community.allstarlink.org/t/failed-to-start-asl3-boot-oneshot-service-asl3-oneboot-task/23210/9).
AllStar node on RPi Compute Module 4?
I noticed this little router by Seeed Studio and thought: what a nice platform this might make for an AllStarLink node! Here’s a screenshot from the Seeed site:

It is a Raspberry Pi Compute Module 4 on a custom baseboard, inside a custom case. At a little less than 4 x 3 inches, it’s a compact and attractive device. The $149 version with 4 Gb of RAM and a 32 GB eMMC card is the one that would probably work best.
Connectivity options for the CM4-based device look great:
2.4GHz and 5.0GHz IEEE 802.11b/g/n/ac Wi-Fi, Bluetooth 5.0, BLE with onboard and external antenna options
The case looks like plastic in the image but is listed as aluminum in the product specifications. The exterior dimensions of the case are 75 x 64 x 21 mm (2.95 x 2.52 x 0.83 inches).
Can you install Debian 12 on it? Yes, according to various sources found during a Google search. Will AllStarLink install and run properly? I think the answer is yes since the CM4 uses the same internals as the Raspberry Pi 4.
Why, you might ask. Well, running the OS from a microSD card (Raspberry Pi 3, 4, 5) is perhaps not as reliable as using an eMMC device for mass storage (CM 4). I could add an NVMe hat to a normal RPi, but then I’d have to find a case that worked with that configuration. Given the small size and with everything contained inside a durable case, this could be a travel device.
This platform is interesting enough that I pulled the trigger and ordered one. If all else fails, I’ll end up with a spare router based on OpenWRT. It will be a few weeks before this arrives from the other side of the world!
A note about Tailscale
I really appreciate Tailscale. I’ve been using it to provide a tunneled IP address between my computer and a remote system. Usually, I use Windows Remote Desktop Protocol (RDP) to access a desktop environment on the remote system, but I also use those addresses for SSH connections.
Tailscale provides more than just an IP address, though. For example, for my AllStar node 588418 machine, I find four options in the Tailscale console:

The first is the local machine name on my network. The second is a domain name (which functions as a URL) to the machine. It works (this is a connection to that machine from the skilled nursing facility 35 miles away):

(I note in passing that if I install Cockpit on the 588418 machine, I would be able to administer the machine through my web browser and a Tailscale address!)
The third item is an IPv6 address for the machine. The last item is the IPv4 address.
Why does this matter? The skilled nursing facility (SNF, or a “sniff”) where my wife is being treated has a security appliance at their network edge, and it blocks many of the places I usually go and the services I utilize. (Example: the chat app we use at work is blocked.) One thing it blocks is plain old IP addresses. I’ve got to have a domain name to make it out into the big wide world. None of my VPNs will make it through that appliance but Tailscale finds a way through, allowing me to use my Tailscale IP addresses and domains to reach my own devices.
A real example is updating my Synology backup machine from 188 miles away. I could RDP to another machine on my home LAN and then connect a browser from that machine to the Synology device. Awkward. Or I could simply hit the domain name provided by Tailscale and go directly to the web-based administrative front-end for the device. Easy.
Similarly, I’m running Cockpit on the Wo-We miniPC that is 35 miles away by simply hitting the domain created by Tailscale. Very convenient.
Changing the frequency of my full-duplex node
As I’ve become more familiar with my full-duplex node (an AllScan ANF101-M-RT85 device), I noted some other traffic on the 147.480 MHz transmit frequency of the node. As I listened over a couple of days to traffic on that frequency, I came to realize it was simplex radio traffic between a couple of friends. I was usually hearing just one side of the conversation, and this also suggested the QSO was simplex, not over a repeater.
Rather than interfere, I changed the TX frequency of AllStar node 588418. Did I have to crack open software to do that? No. All I did was change the frequency on the Retevis RT-85 that serves as the transmitter for the node and then change the RX frequency on my handheld to match.
Because of deviation, I moved down to 147.470 MHz. With the node transmitting at low power, and using my mobile radio to receive, I was able to receive intelligible signals from my node up to 2.5 miles away in gently hilly, wooded terrain. My guess is this is not going to interfere with the hams who are using 147.480 MHz as they are likely transmitting at much higher power and thus are more distant than the reach of my node. However, if it becomes a problem, I can change the frequency again and/or add an attenuator to the transmitting radio.
A note about Field Day
Is Field Day about contesting or camaraderie? Both, I think. Some radio amateurs love the contesting aspect of Field Day. Some like getting together with like-minded people, and the sharing and learning that goes along with that. Some like both.
I hope you find something enjoyable to do with amateur radio on Field Day this year. I won’t be in Portland for Field Day so I’ll miss visiting the Hoodview Amateur Radio Club site on Larch Mountain, east of Portland. But I may get to visit the Mason County Amateur Radio Club’s site this year. I look forward to visiting my ham radio friends.
73 to all. Remember to touch a radio every day!

Glad I could help you spend your money on yet another radio. While I like my GD-88, I find the lowest volume setting still a little loud for inside listening. Because I use mine for DMR, now I too need to have a close look at its duplex behavior with analog. Cheers, KA9QJT