

Random Wire Review: Issue 129
May 1, 2025: A typical amateur radio morning for me; AllStar node terminal enhancements; interfacing an amateur radio microphone with my PC; new Quadra4K HamClock; upgrading WPSD; and more!


There is a lot in this issue about AllStar, WPSD, and Pi-Star. In the next issue, I hope to report on an M17 radio, so stay tuned if you’re interested in M17!
In this issue…
My typical morning with amateur radio. What nets do I listen to on the regular, and what systems do I use?
AllStar node terminal enhancement. Two simple options you can try to see more information whenever you open a terminal window on your node.
Using the AllScan UCI120 with my computer. Can I use an amateur radio microphone with my computer? Why yes, yes I can!
New Quadra4K HamClock. Is this upgrade worth it? Yes. The Quadra4K responds more quickly in my web browser. This is particularly during transitions.
How to manage WPSD favorites. There isn’t a way to do this built into WPSD but it’s easy to keep a list on your phone or PC.
Upgrade WPSD on Raspberry Pi 3B+. A new image was available so I took the plunge.
DVMEGA Cast multimode IP radio. I missed seeing this when it came out. It’s a price desktop appliance that may appeal to some folks.
Change your Pi-Star interface colors. Heard on the air: can I change my Pi-Star dashboard colors? Yes. Here’s how.
AllStar: multi-node dashboard and call forwarding. Where is the management dashboard for multiple nodes? How can I “call forward” to my other nodes?
HT antennas for Retevis RT85. I bought some Nagoya-brand antennas for my Retevis RT85 radios. But I bought the wrong ones the first time so I also upgrade the antennas on my TIDRADIO TD-H3 and TD-H8 radios.
Side project: Sun Cobalt Qube 3. I bought an old all-in-one server and now I’m wondering how to modify it.
Ham Radio Workbench podcast 234. I had forgotten about using VLF-EM as a geologist to map a hidden fault about 45 years ago. Thank you to the HRWB crew for reminding me of this as they discussed a ground-loop antenna that was submerged due to flooding.

My typical morning with amateur radio
I spend much of my time working at a computer, updating spreadsheets, writing reports, and participating in Zoom and Teams meetings. What folks don’t know is I am surrounded by various nodes, hotspots, and handheld radios, so when I say “touch a radio every day,” I actually do exactly that.
I like to catch some morning nets while I work, so I will typically listen in to the WW7PSR Puget Sound Repeater Group’s Nine O’Clock Net and the Coffee Break Net on the W6EK system. I also like to monitor the WB2JPQ East Coast Reflector. Sometimes I listen over an AllStar node that goes to a handheld radio, sometimes I’ll use my SIP phone, and sometimes I’ll use IAXRPT on my Windows laptop. If I’m going to take the trash out or take the dog for a walk, I take a handie talkie with me. It’s nice to have so many options.
When I’m at my desk, I’ll have at least one instance of AllScan running so I can see activity on the nodes I’ve saved. AllScan makes it a snap to see activity and move from net to net.
If I’m driving in the Portland, Oregon area, I’ll listen to nets on the W7RAT IRLP repeater system and also tune to the Kansas City Wide system on the WA7BND repeater. I regularly scan for active repeater traffic (I have 700 repeaters programmed into my radio) and monitor 146.52 MHz. I also have APRS running on my mobile radio most of the time.
If I’m driving in the Seattle area, I like to try to tune into the WW7PSR repeater with my Yaesu FTM-300DR mobile radio, but I don’t have a lot of luck with that for some reason. It’s a mystery. So what really happens is I usually connect to WW7PSR through DVSwitch Mobile on my smartphone.
Once in a while, I’ll put an AllStar node in the vehicle, linked to a cellular hotspot. That tends to work okay, but lately I’ve been connecting to one of my AllStar nodes through DVSwitch Mobile using Web Transceiver mode, and using that method to connect to specific nodes.
I also have my Hamshack Hotline number on my smartphone, running through the Groundwire app. This makes it easy for me to connect to my “node in the cloud” 57945 and connect through that node to other nodes. I can do this from home but there’s no need. When I use this method, I’m usually mobile.
My biggest challenge is deciding what method I’m going to use on any given day. As I type this, the W6EK Coffee Break Net has just concluded. I was listening to it on my node 578493 (an AllScan ANH100) through IAXRPT on my laptop computer. In the words of Robert Half:
It's easy to make good decisions when there are no bad options.
Speaking of options, check out the many ways you can participate in the Extended Freedom Network as shown on their home page: https://extendedfreedom.network/:
AllStar
EchoLink
DMR
SIP phone
Yaesu System Fusion
Peanut
DMR+ (DVScotland)
Hamshack Hotline
TGIF Digital Network
Hams Over IP
Teamspeak
Whew. That is a lot of options!

AllStar node terminal enhancement
Some time ago, I installed screenfetch (sudo apt install screenfetch) on several of my AllStar nodes. Then I added “screenfetch” (without the quotes) at the end of my .bashrc file on those nodes, so that every time I logged into a terminal window, it would run. Screenfetch provides some helpful information to me as a node operator.
However, since the overhead on screenfetch is a bit high, I began looking for alternatives. I found several but most of those projects were abandoned (i.e., not being maintained). Linuxlogo was an exception (although it was last updated in July 2022) and it required fewer resources than screenfetch, so I gave it a try.
In the screenshot below, you’ll see a screenfetch display in the top half of the image and the linuxlogo display in the bottom half of the image. (The colors in the screenshot are not nearly as bright as they are in real life.) Both applications are installable on a Debian AllStar node using sudo apt install [program name].

The computer in this demonstration is a Beelink T5 micro PC, not my usual Dell Wyse 3040 thin client computer. Here is what it looks like on a Dell 3040:

Is this important? No, not really. I like it, though, because it reminds me what machine architecture I’m on, and it’s a nice interruption from a plain old terminal display. Of the two options, Linuxlogo requires fewer additional packages. While Linuxlogo presents a simpler, quick display, I confess that I prefer Screenfetch, even though it requires quite a few more packages (and storage space) than Linuxlogo.

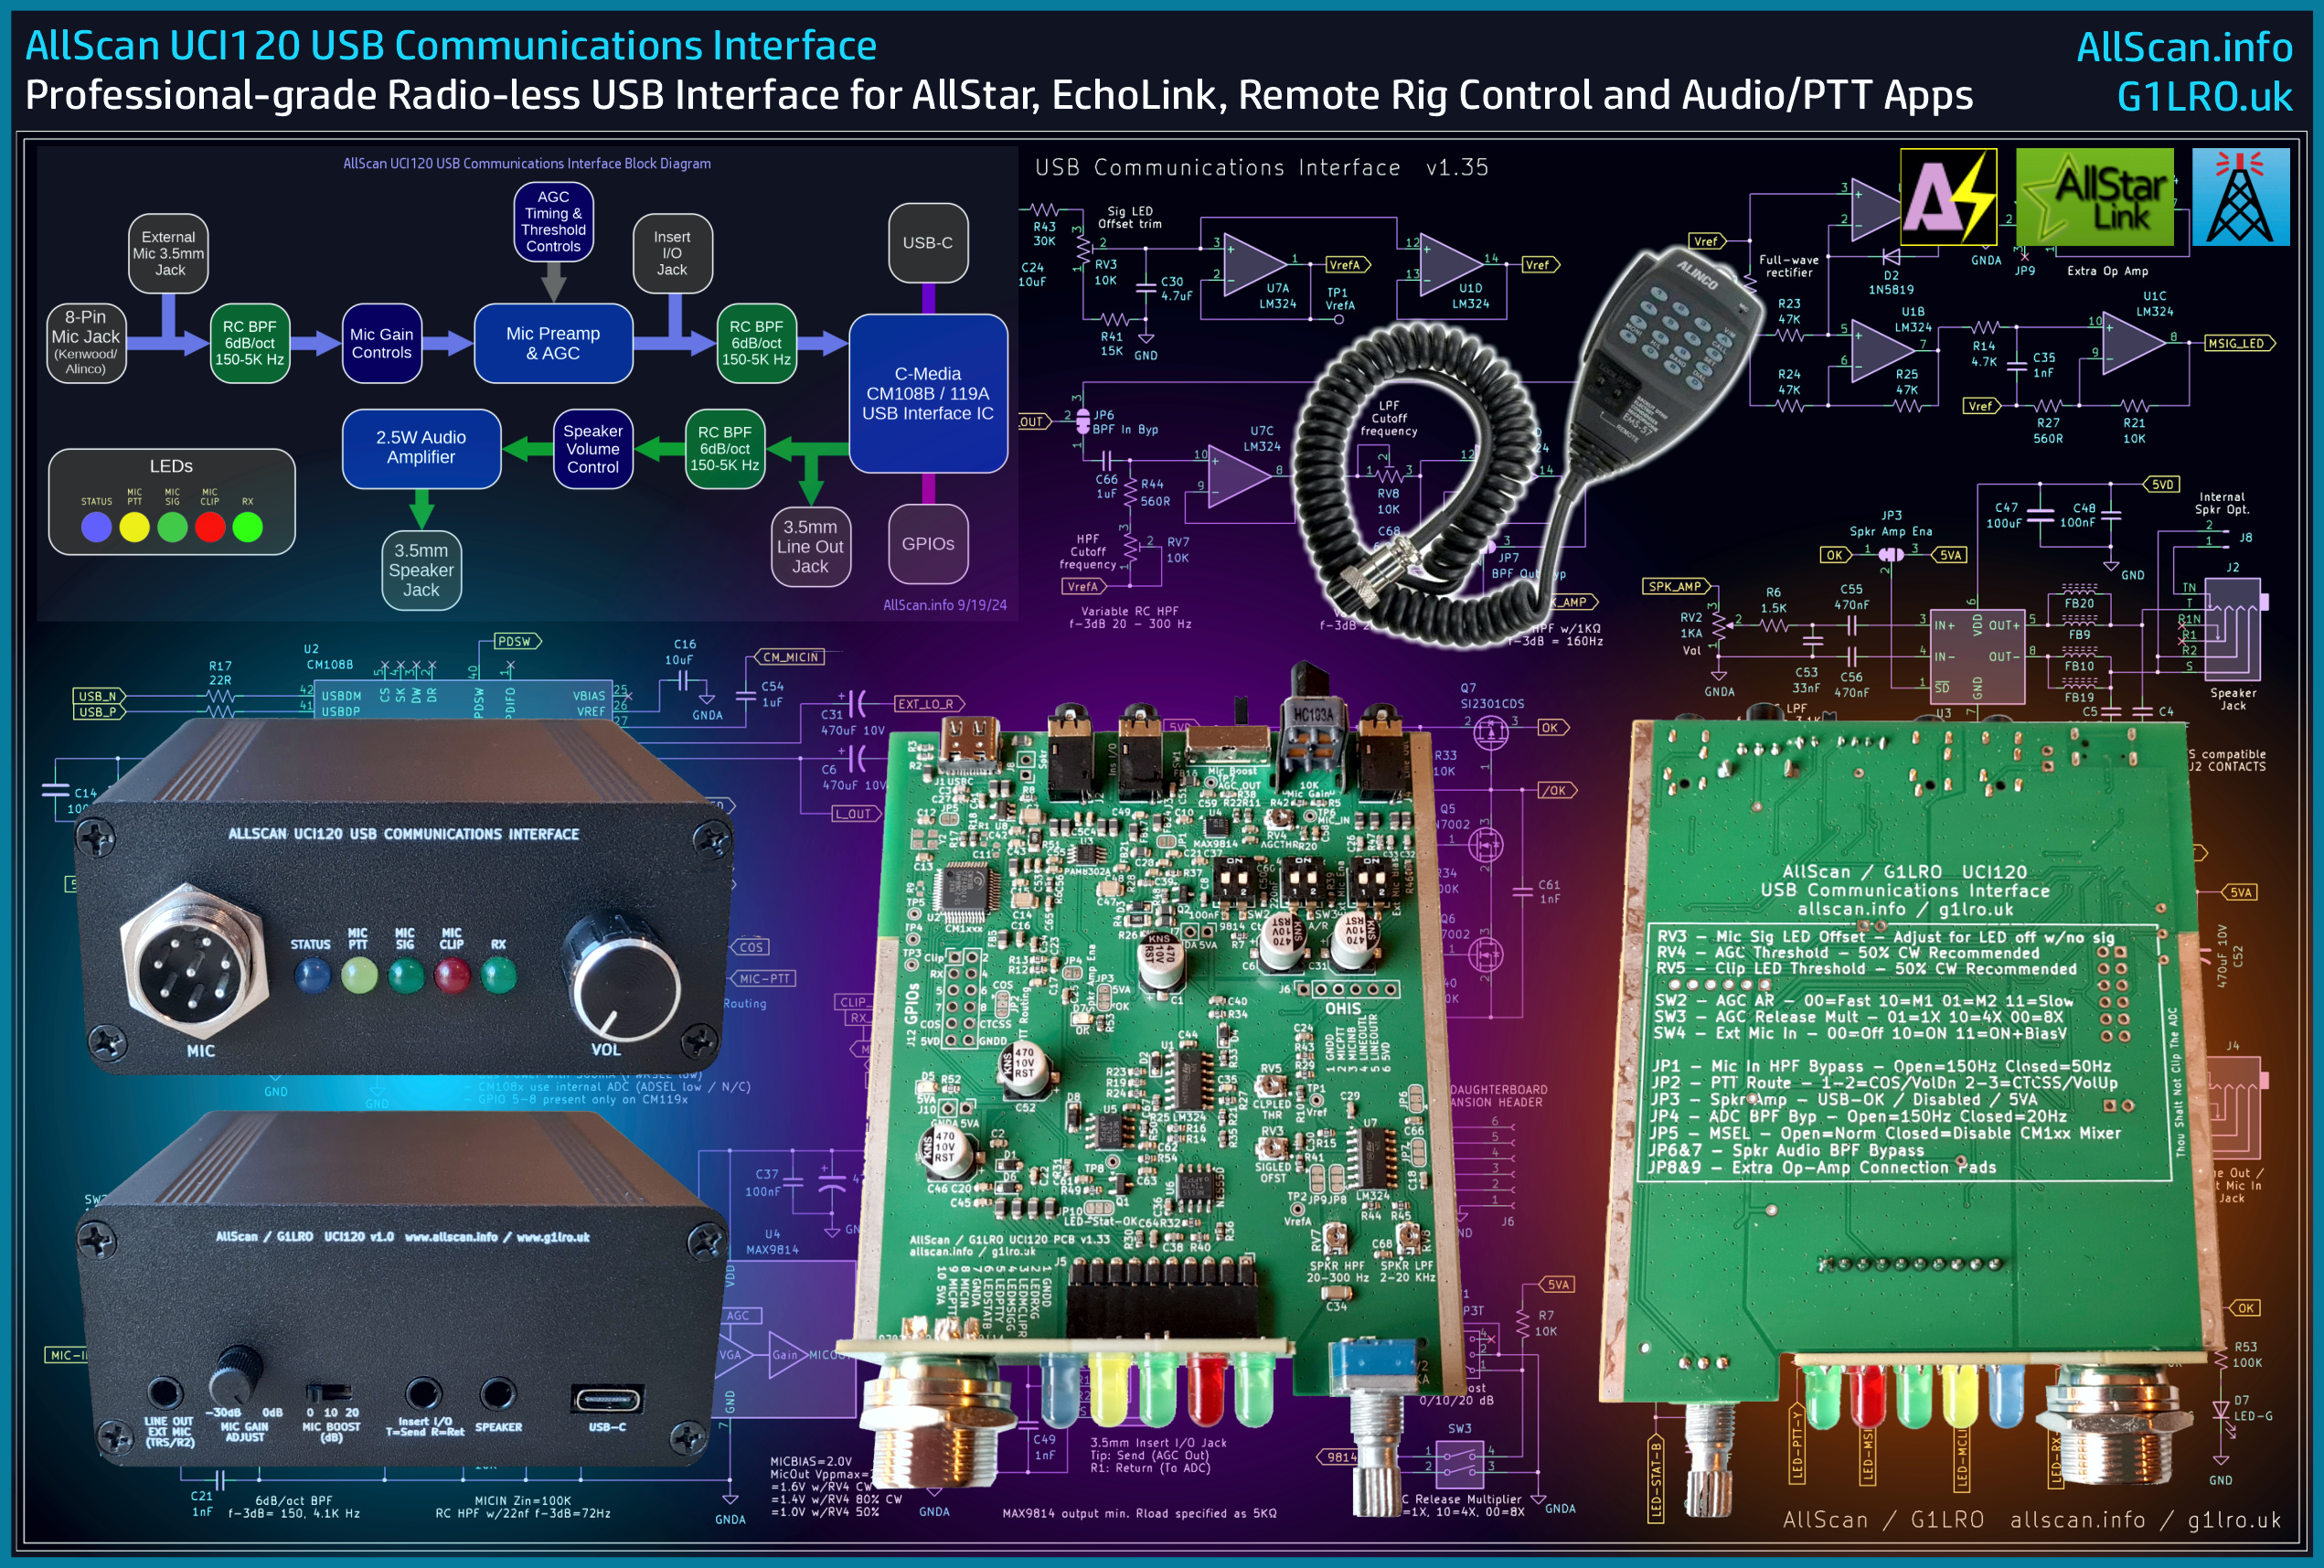
Using the AllScan UCI120 with my computer
Before I start building my next node, I thought I would try connecting a Kenwood desk microphone for amateur radio to my laptop computer, using the AllScan UCI120.
The TL;DR: It worked.
The microphone is an old Kenwood MC-80 I picked up on eBay. This device takes 4 AA-size batteries and this particular unit came with some old, corroded batteries in the battery compartment. I cleaned that up months ago and have been waiting for a good opportunity to try this mic on the computer.
Enter the AllScan UCI120. It is an audio interface that connects to a computer, not a radio, and supports using an amateur radio microphone with your application.:
The UCI120's primary application is for use in Radio-less AllStar nodes but it can be also used with any other PC / smartphone / embedded / VOIP application that would benefit from a high-quality interface to amateur and commercial radio communications microphones and speakers.
I put fresh batteries in the Kenwood MC-80 mic, connected it to the front panel of the UCI120, and plugged it into my laptop. I heard a ping sound, meaning the system detected the device. Good so far.
Then I opened the IAXRPT app on my phone and connected it to my ANH100 AllStar node number 578493. Using the AllScan application, I then connected 578493 to the Enhance Parrot node 55553 and began testing.
And it worked. I got a pretty good report from the Enhanced Parrot.
The audio quality is not what I’d like, and that may be the fault of the microphone itself. There’s no telling what this device has been through in its long history. Or it may be that I had the mic gain pushed up a bit too far.
So I pulled my “go to” Kenwood MC-60 desk microphone from node 588412 to try it with the UCI120. I dialed back the gain just a little bit. I think this sounds pretty good, considering that IAXRPT probably introduces some distortion to the audio:
Of course, the distortion may also be due to how I captured the audio by setting my smartphone on the laptop and recording through the air from the computer speakers to the smartphone microphone. Given a bit more time, I’m sure I could figure out how to record more directly to the computer.
I’m happy with this proof of concept. I’ve wondered many times if there was a fairly simple way to use an amateur radio microphone through my computer and now I know the answer is yes.
The UCI120 is a great little device. It’s the interface for my AllStar node 588412 that sits on my desk. When you view the product brochure, you can tell that David Gleason NR9V put a lot of thought into designing and manufacturing this device.
New Quadra4K HamClock
Setup is easy, especially when plugged into an cabled network. It only took a few minutes from unpackaging to seeing this display in my browser:

This is the full-screen display using mainly default configuration entries. I added my call sign and Maidenhead grid square, and reduced the number of bands in the Live Spots display. That’s it.
The Quadra4K device itself is a lightweight square with rounded corners. An LED information display on the front scrolls your LAN IP address (helpful!), CPU temperature in Celsius, the sunspot number, and the solar flux index.
Configuration instructions are thorough. It takes longer to read them than to set up this device.
My order arrived in just a few days, but that may be because I’m within 10 miles or so of the vendor. I bought the “Quadra4K HamClock Bundle with Mini-Keyboard” for $59 plus shipping. Since I plugged the device directly into my network, I didn’t need the keyboard. The device without the keyboard costs $10 less. With the Quadra4K unit, you don’t need the other things listed in the Inovato catalog at https://inovato.com/collections/all. The Quadra4K is a great upgrade.
I’ll keep my old one as a backup. I also have another still-new-in-the-package Quadra (the older model) that I plan to donate for an amateur radio club function.
If, perhaps, you don’t want to spend 50 bucks on a Quadra4K, check out the Hamshack Dashboard. A working demo is available at https://nject.us/HAMSHACK-DASHBOARD-O.html. The version I’m running on my cloud server is older so an upgrade is now on my TO DO list. I have upgraded my instance of the dashboard. Find it at https://kj7t.net/ or click this direct link: https://kj7t.net/HamshackDashboard.html?callsign=KJ7T&&utc=-7&&state=WA2.
My dashboard refreshes every 15 minutes to reduce load on the server (the default is 5 minutes). Please do not link to my instance as that increases the bandwidth consumed by my node-in-the-cloud AllStar node!
You can run this on most computers because it is simply an HTML file. Go to the working demo and download the web page to your computer. Documentation for the Hamshack Dashboard is in a PDF at https://nject.us/HAMSHACK-DASHBOARD-DOCUMENTATION.pdf.

How to manage favorite reflectors in WPSD
That is a misleading title, because there isn’t a good way to manage a list of favorite reflectors in WPSD. However, you can keep a list elsewhere.
I’m a big fan of the AllScan application for AllStar. I use AllScan to keep a list of favorite nodes and to see which of my favorites are currently active. Wouldn’t it be nice to have something similar for my WPSD hotspot? (I use my hotspot only for Yaesu System Fusion.)
If you don’t know what WPSD is, Derek Moyes K1DDM has a very helpful PDF presentation titled Getting Started with WPSD & YSF.
I thought WPSD Profiles might do this, but when I set up different profiles for different Yaesu System Fusion reflectors, switching to a different profile does not change the reflector I’m linked to. I’m sure that is by design and I’m sure there is a good reason for it. I just don’t know the reason.
An alternative for this would be to have a notes field attached to each profile where you could record the reflector you wish to use. That feature enhancement isn’t really necessary because you can simply keep a list in your favorite notes application. Right now, I keep a text list in a OneDrive folder.
To select a different reflector through the WPSD Dashboard, you go to Admin —> YSF Manager —> YSF Link Manager, and then select the reflector you wish to connect to.
All credit to Chip W0CHP for providing searchable lists of YSF reflectors (https://w0chp.radio/ysf-reflectors/) and FCS reflectors (https://w0chp.radio/fcs-reflectors/). The search function in these lists is “live” so when you start to type in the search box, the list swiftly returns matching records. Nice.
A side note: I noticed that the WPSD user manual and the reflectors page are built with Hugo. I like how fast those resources are so I’m going to dig into Hugo a bit and see if it is something can use. If it uses Markdown (it does!), even better.
Upgrade WPSD on Raspberry Pi 3B+
I saw on the WPSD Discord channel that a new image was available, and upgrading meant flashing the new image to a microSD card. What I didn’t find was a good, step-by-step set of instructions all in one place to help me through the process. What I did find was good instructions in separate places.
An A-to-Z recipe would be helpful. In the information technology universe, we call this a runbook. I find that calling it a runbook confuses my non-technical friends so I just describe these sets of step-by-step instructions as recipes. Everyone understands what a recipe is.
And don’t discount the value of saving your own recipes. As we get older, it may become harder to remember a lot of details. Speaking quite candidly, I don’t configure my hotspot very often, so it seems new and confusing to me each time. This is where a good recipe for your system becomes invaluable. When you know how to do it, you’re more likely to upgrade to the newest and most secure system/version.
Before you proceed, reviewing the FAQs is mandatory. Find them at https://w0chp.radio/wpsd-faqs/.
Get the new image and verify it
Find the image for your hardware at: https://w0chp.radio/wpsd/#download-wpsd
Download the compressed image file for your particular hardware. I’m using a Raspberry Pi 3B+, so I downloaded WPSD_RPi-Bookworm.img.xz.
It’s a good idea to verify the image file. In Windows 11, you can do this with PowerShell with Get-FileHash. Open PowerShell as an administrator by entering PowerShell in the search box, then selecting Run as Administrator. Change directories to the location where your downloaded file is located. For me, it is in Downloads, so: cd C:\Users\tsalz\Downloads. Use Get-FileHash to get the hash:

Compare the hash to the SHA-256 checksum for the disk image, located just below the downloads. The hash produced by Get-FileHash matched the value in the WPSD text file so I proceeded with the installation.

Install the image to a microSD card
The official WPSD User Manual has detailed instructions for two different tools: Balena Etcher and the Raspberry Pi Imager. I used the Raspberry Pi Imager to burn the image to a SanDisk Ultra card from the 5-pack bundle I had on hand. (I note that the microSD card reader included in the bundle seems fragile.)
I encourage you to save your WPSD configuration. I did that through the WPSD Dashboard: Admin —> Configuration —> Backup/Restore. Unfortunately, I did not notice that Windows 11 was suspicious of the downloaded file so the system didn’t keep it. Fortunately, I had screenshots of my configuration details and a record of my Brandmeister API key so it wasn’t too difficult to manually configure the upgraded hotspot.
You can use Balena Etcher or Rufus, but I used the Raspberry Pi imager application on my Windows 11 PC.
To install WPSD using Raspberry Pi Imager, follow these steps:
Download and install Raspberry Pi Imager from the Raspberry Pi downloads page.
Insert your SD card into your computer using a USB adapter if necessary.
Open Raspberry Pi Imager and select the device to flash.
Choose the "Use custom" option and navigate to the WPSD disk image file you downloaded, such as WPSD_RPi_Latest.img.xz.
Ensure the correct SD card is selected as the destination device.
Do not create a user or change the password using the advanced options; the "pi-star" user and password are already on the disk image and are required for WPSD to function properly.
Select the "Flash" button to write the disk image to the SD card.
After the process is complete, you can insert the SD card into your Raspberry Pi and power it on to start using WPSD.
Correcting my Nextion display
As I worked on my hotpost, I noticed that the Nextion display was missing my call sign and my DMR ID.

After I SSH’d into the node and dug around a bit, I went back to the WPSD configuration screen to try some different settings. What worked for me was to select:
MMDVM Display Type: Nextion (enhanced w/driver, attached to modem)The port is “modem.”
Where I struck gold was in the display settings. The “ON7LDS L3” selection corrected the problem with the missing callsign and DMR ID:

But what is the “ON7LDS L3 HS” setting? HS stands for high speed and refers to the baud rate set for the display.
I found the answer to this question at https://forum.pistar.uk/viewtopic.php?p=1444#p1444:
Screen Layout:
0 Is the G4KLX Layout
2 or ON7LDS L2: Layout 2 is a no-nonsense layout. It is the original (G4KLX) layout with the Talker Alias added. TA color and fonts size can not be changed. At least not easily.
3 or ON7LDS L3: Layout 3 (as is L3 HS) is a layout without any predefined layout options (color, fonts). It sends the fields and information about what was sent to the display, so all layout processing can and should be done in the display itself.
4 or ON7LDS L3 HS: Is the same as L3 but instead of 9600 baud rate 115200 is enabled.
For more details see the Github page for g4klx/MMDVMHost
For my screen layouts check out https://github.com/WA6HXG/MMDVM-Nextion-Screen-Layouts
Mounted my hotspot in the air
You might notice in the photos above that my hotspot isn’t sitting flat on a desk or shelf. I like to be able to glance at the hotspot and see the display, but with the hotspot sitting flat, I found that I couldn’t read the display from my chair. I was toying with the idea of rebuilding the node with a different case that would present the Nextion display in a more upright position but then realized that a smartphone holder might be a much simpler solution. Did this work? It did. I call this “hotspot on a stick.”
The stand I selected is a bit tall but it sets just right for me, and for $11.25, it seemed like a very inexpensive experiment.

Do I really need to cool the node?
An unexpected advantage is the device in the “hotspot on a stick” configuration seems to run a little cooler when under load. I put the fan I bought last year below the hotspot for added insurance. The fan is powered from one of the hotspot USB ports.
The fan has been running non-stop for a year. It’s quiet and moves plenty of air, even at the low speed setting. For $9.99, it was a great purchase. Something to consider, though, is that the fan seems to increase the CPU load. Running the fan on high bumps the CPU to 38% utilization. At this load, I see the temperature rises by a few degrees Centigrade.
Hmmm…let’s try some different settings and see how the CPU load and temperature change.
At idle with the fan off, the CPU is running at 21% to 23% utilization…and the temperature is within a degree of when I run the fan at the high setting. At idle with the fan set on low, the CPU bumps up to about 32% utilization…and the temperature is about the same.
These observations were made with the WPSD dashboard running in my browser. What happens when I close the dashboard? It should present lower load to the Raspberry Pi. I don’t see the CPU utilization on my hotspot screen but I do see the temperature. With the fan set on low, the temperature is dropping while I type this, even though there is now a QSO underway. The temperature was about 59° C and now it is 54° 51° C.
I turned the fan off while the QSO continued, and without the dashboard running in my browser, the node shows a temperature of 49° C. The ambient air temperature in the room is 71° F (21.7° C). (And after a couple of hours with no dashboard and no fan, the temperature has moved between 48° C and 50.5° C. This time period includes some long QSOs received. As soon as I opened the dashboard in my web browser, the temperature began rising.)
From this I conclude that to hold down the temperature, I can simply close the dashboard in my browser. On a hot day (no air conditioning here!), I may need to run the fan. The rest of the time I don’t really need it so I’ll leave it off.
Note that although the temperature of the Raspberry Pi is well below the hard temperature limit, it has been approaching the soft limit where throttling occurs:
For Raspberry Pi 3 Model B+, the PCB technology has been changed to provide better heat dissipation and increased thermal mass. In addition, a soft temperature limit has been introduced, with the goal of maximising the time for which a device can "sprint" before reaching the hard limit at 85°C. When the soft limit is reached, the clock speed is reduced from 1.4GHz to 1.2GHz, and the operating voltage is reduced slightly. This reduces the rate of temperature increase: we trade a short period at 1.4GHz for a longer period at 1.2GHz. By default, the soft limit is 60°C, and this can be changed via the
temp_soft_limitsetting in config.txt.
I notice that my C4Labs case is made for the Raspberry Pi 3B+ and for the RPi 4. A fan shim is available for the RPi 4. I think if I build another node with this case, I’ll use the RPi 4 and give the fan shim a try.
DVMEGA Cast multimode IP radio
I’m not sure how I missed seeing this. I guess I wasn’t paying attention five or six years ago. The DVMEGA Cast is billed as “the Swiss army knife for Digital Voice.”
It is:
AMBE3000 based Multimode IP radio for DMR, D-Star and Fusion. Based on standard DVMEGA AMBE3000 shield. Radio has a powerfull 3 Watt enclosed speaker and according amplifier. Rotary encoder and 2.4″ touchscreen for operation. Quick menu is accessible via mic buttons. Host system is based on Nano-PI with PI-Star pre-installed.
You can use it for sending and receiving transmissions on D-Star, DMR, and Yaesu System Fusion. The Nextion display is also used for touch control of the device.
eBay has one for US $449.95 if you want to take a flyer on this. GigaParts has units in stock at US $399.95. Note that you would also need a Yaesu DTMF microphone, Ethernet cable, and power supply.
I can see this being a viable alternative to a hotspot, but I’ll admit I like the compact character and good audio quality I get through my home-built hotspot! The hotspot cost much less to build. Using it means I’m also using a handheld radio to send and receive voice with a radio.
Learn more about the DVMega Cast in a 2022 blog entry by Robert WB4SON. and in a 2021 review by Tom M7MCQ.
Change your Pi-Star interface colors
I overheard a Pi-Star user wondering if he could change the colors of his hotspot display to be dark. He said he operated mainly at night in his vehicle and the bright colors and white background of the Pi-Star dashboard were difficult for him in that environment.
The answer is: yes, you can adjust the color scheme. In Pi-Star version … go to …
The standard Pi-Star dashboard is dominated by red and white:

In the following screenshot, I’ve changed three parameters to change the red to green and the white background to light gray. I find these colors more comfortable to view.

Here are the three entries I changed in the CSS Tool screen:

In the Background section, the original color for Page was edf0f5 and the new color is D3D3D3.
The original color for content was ffffff and the new color is D3D3D3.
The original color for Banners was dd4b39 and the new color is 008000.
And if you mess up, don’t worry. There is a button at the bottom of the CSS Tools page to reset the color scheme to factory defaults.
I settled on a more soothing blue color for my dashboard:

AllStar: multi-node dashboard and call forwarding
AllStar management dashboard for multiple nodes?
I haven’t found a dashboard that would let me manage multiple nodes at once. I’m still looking. In the meantime, I created a custom list of my nodes in AllScan on one node. If there has been recent activity, that will show up. It shows the nodes that are currently registered (which means powered on and authenticated) at AllStarLink.org.

Doing this in AllScan seems a bit more convenient than jumping to the AllStarLink.org site to check my nodes:

How about call forwarding?
One of the features I’d really like is some kind of call-forwarding for AllStarLink. I have so many nodes that it becomes impossible for my amateur radio friends to know which one to call. If I could automatically forward incoming calls from one node to other nodes, I could give out the one node number. If you know of such a tool, or how to do that with existing AllStarLink 3 systems, I am all ears!
Of course, there is a way to do this by linking one node to another using a permanent link. I tried this by connecting my Portland, Oregon node 588412 to my Olympia, Washington node 588415:

Then I connected to 588412 with DVSwitch Mobile in Web Transceiver mode and transmitted my call sign. It came through very nicely to my SIP phone that was connected to 588415.
The permanent link won’t survive a system restart. I could use a macro in /etc/asterisk/rpt.conf to restore the connection when the system restarts. I’ve not done that yet.
HT antennas for Retevis RT85
I also picked up a couple of Nagoya-brand VHF/UHF antennas. An SMA male antenna is for the Retevis RT85 on my AllScan ANH100 node 578493.
An SMA female antenna is for my TIDRADIO TD-H8 handie talkie. This should give me great range as I’m walking near our home.
They don’t seem to be any worse than the stock RT85 antennas. Time will tell how they hold up.
Side project: Sun Cobalt Qube 3
I bought an old Sun Cobalt Qube 3 Professional all-in-one server and it looks great. It boots up. The light turns green and the LCD provides information. This thing is just very cute.

It’s also very old, being made more than 20 years ago. Those were the 32-bit operating system days. This hardware won’t run a modern 64-bit OS.
At boot, the Qube ran through the disk check routine, found the network, negotiated an IP address from my router (acting as the domain controller), and says it is running. The fan is on and I hear the old drives being accessed. (I had forgotten the mechanical sounds made by these old hard drives. Boy, did that bring back memories of being in data centers, immersed in a cacophony of fan and hard drive noise!)

The Qube has an external power supply. Today, we talk about power bricks and people complain about how big they are. Twenty years ago, the power supply was actually the size of a brick. It’s huge.

But I can’t log in. The login screen is missing the login form. When I looked at the page source, the code for that form has been commented out. That probably means to be able to log in, I’ll have to restore the operating system. I did try resetting the admin account and saw the confirmation in the Qube LCD screen that it was doing that, but the login page is still not allowing the login form to show.
I wondered if maybe modern browsers might be blocking the page so I downloaded (source: http://www.oldversion.com/) and installed Netscape Navigator 9 from 2008 (there’s a trip down memory lane). Same result, i.e., no login form is displayed:

What’s inside? The motherboard in the Qube is oriented vertically inside the case. It’s a little smaller than a mini-ATX motherboard.

The basic specs for this unit are:
Q36 CH8 U20U - Qube 3 (Professional Edition) with 450MHz, 128MB SDRAM, 2x20.4GB HDD with RAID 1 mirroring, SCSI interface and Web Caching
After inspecting the system, this Qube matches those specs with one 128-megabyte stick of RAM and two 20-Gb hard drives. It has two drives (probably 20 Gb each) which appear to be SAS (Serial Attached SCSI) drives, presumably mirrored in a RAID 1 array.
The interior is pretty clean and the capacitors all look fine. The system did power up and run for a few hours without complaint, although as noted above, the fan and the mechanical hard drives make noise.
I reached out to the vendor I used more than 20 years ago and found he had moved his operation from Germany to Colombia. We had a nice exchange (it’s nice to be remembered!) and he provided some very helpful information. The bottom line is this: even if I got the system restored to working condition, it can’t be modernized. There is no boot sector on the hard drives. Instead, booting is controlled by a programmed EEPROM. It’s a 32-bit system and all of the software is quite old.
The Qube 3 was abandoned a long time ago. It wouldn’t be safe to put this on the open internet. It might have utility on a private network but it would be slow and present risks, no matter how carefully one tried to protect it.
I conclude that I should investigate turning it into something else. One person turned his into a “Hackintosh.” Another turned a Qube into a network-attached storage (NAS) box. There probably isn’t enough internal room for a mini-ATX motherboard without making some mechanical alterations. (The Qube is about 190 x 190 mm, and a micro-ATX mobo is 170 x 170 mm.) Nevertheless, a mini-ATX would give the greatest range of capabilities.
Or I could stuff a Raspberry Pi cluster inside. Building a cluster would be a great learning experience.
I think a Raspberry Pi Dramble would easily fit inside.
Ham Radio Workbench podcast 234
I really enjoyed listening to the HRWB podcast #234 on a drive from Portland, OR to Olympia, WA. One of the most enjoyable segments for me was the conversation about a ground-loop antenna that was underwater due to local flooding. A comment was made about very-low-frequency (VLF) waves and submarines.
That took me back to 1980-1981 when I used VLF-EM to help locate a fault zone. This required two people walking together on previously established lines, with equidistant points established on the lines. One person carried the receiver and the other person recorded values in a notebook. We would pause at each point and record the time and the VLF-EM reading. Once we got back to the office, the values were plotted on a map and then contoured to illustrate patterns. If there was a frequency shift during the field survey, adjustments were made to the raw values to compensate, using the time the point was recorded.
I was told that the VLF frequency we used to map the fault was the same used by U.S. submarines. Information in Wikipedia seems to verify this.
This worked brilliantly. We knew there was a fault under the soil of the hillside but we didn’t know exactly where it was. Contouring the VLF-EM data revealed not only the fault, but an offset to the fault. This proved to be very valuable during later mineral exploration.
I’m very glad the HRWB folks jokingly mentioned VLF and submarines, because it brought this old memory back into the light.
73 to all and remember to touch a radio every day!

Errata and a call for help :)
- Hugo generates my w0chp.radio website; Sphinx generates the WPSD user manual.
- “File hashes for recent Pi-Star releases”. Uhm…those are for WPSD. Not Pi-Star. Heh.
- “An A-to-Z recipe would be helpful”. That is covered in the user manual - as it’s essentially the same process as installing from scratch.
Additionally, the user manual as well as the WPSD project, are community projects, where others really can and should help. I’m just one guy, and I don’t have enough consistent help. I can’t do this alone, and I pretty much do, unfortunately.
The more people want things and don’t contribute, the more it leads to project leader and developer burnout. I simply can’t keep up with the project coupled with all of the demands and wishlist items PLUS the support; All of which is free and open source. I need help :-)
I built all of this myself to scratch my itches. If people have itches, it sure would be nice if they scratched them and contributed rather than “wishing.”
Unfortunately, it’s unsustainable; and securing talented and consistent contributors and project volunteers/members is very challenging. Instead, the wishes continue. ;-)
WPSD is the only open source software for amateur radio digital voice of its kind with an official user manual, and I’m proud of it. But it needs others to help.
- Presets/memories: WPSD will remember all of your startup reflectors in every profile as well as your backup. “Admin —> YSF Manager”, etc. are for temporary, on-the-fly instantaneous changes and are not permanent. Permanent startup reflectors, etc. are saved in the configuration page which are also saved in profiles and backups.
- DVMEGA CAST: The WPSD project, or I, worked with DVMEGA personally to develop a custom disk image, which actually does support CAST memories and presets. This is due to the special mainboard and microprocessor in the unit itself. To do true presets and memories, that is a function that can really only be achieved by hardware and not hotspot software.
- Have you clicked the “Appearance” button at the top of the WPSD dashboard navbar? If not, you’ll be pleased. No need to look up hex codes or anything like that. Try it out. And for OLED users, you can completely shut the display off for true night mode operation in the Appearance page.
Last but not least! <https://w0chp.radio/articles/how-to-contribute-to-wpsd/>
73, W0CHP
Interesting issue as always Tom! You run rings around me about Amateur Radio over Internet! I always learn something new in each issue. I'm also a fan of the Cobalt Qube (I've acquired two of them) and they'll probably get a brain transplant of a Raspberry Pi 5 (if I live long enough to tackle such non-radio projects)... or by then perhaps Raspberry Pi 6 or 7. Also the Cobalt Raq's are similarly cute for a 1U rack mount unit.