

TechNote: Configuring a SIP phone for AllStarLink 3
TechNote-3, December 24, 2024: Installing AllStarLink 3, and configuring the ASL3 node and the Snom D710 phone to work together.

The problem and approach
A subscriber purchased a Snom D710 phone but has been having trouble configuring it to connect with his AllStarLink node. As I thought about this, I recognized it presented an opportunity to learn more about this topic.
My approach? Buy the same model phone and figure it out. I found a used Snom D710 SIP phone for $20 from Bargain IT. It arrived in good condition, having been well-packed in a double box with plenty of plastic bubble wrap for cushioning. I know the phone is used, but it is in excellent, near-new condition.
The D710 can be powered over a power-over-Ethernet (PoE) connection or with a power adapter. My PoE switch had no available ports so I also ordered a power adapter.
I had previously connected one of my nodes to a SIP phone, but that node was running AllStarLink 2 (ASL 2). When I upgraded that node to ASL 3, I learned that /etc/asterisk/sip.conf no longer controlled the connection — now the configuration is held in /etc/asterisk/pjsip.conf. I had struggled a bit with pjsip.conf but did get it to work.
Setting up a PC for this project
Install Debian 12
I installed Debian 12 and AllStarLink 3 on a Dell OptiPlex 7050. This particular 7050 is one I got cheap, with 8 Gb of RAM and a 512 Gb hard drive. I upgraded the RAM to 16 gigs before installing Debian.
And you know what? Having a hard disk drive (HDD) on board makes the whole process of installing Debian slower, compared to using a solid state disk (SSD). The slowness of the system during unpacking, verifying, and installing the bits and pieces of Debian was very noticeable. Installing the base system was excruciatingly slow. (This just made the case for me to replace the HDD with an SSD!)
I chose KDE Plasma for the desktop environment.
Install helpful/necessary packages
I also installed the suite of packages I prefer, including:
curl
php
unzip
ufw (ssh, http, https, 3389, 41641/udp, tailscale0)
xrdp
Tailscale
mlocate
zutty (which I find faster than Konsole for terminal work)
rdiff-backup
Made sure I could remotely access the machine
Once all those were installed and the UFW firewall configured, I rebooted to check that the system was functioning normally. Once confirmed, I shut down the 7050, disconnected the mouse, keyboard, and HDMI cable, and restarted the machine. Then I found the Tailscale address for the 7050 in my Tailnet listing, pasted that IP address into the Windows RDP application, and proceeded to connect remotely to the now headless 7050 machine.
Debian 12 is a bit eccentric when accessed remotely
Debian 12 exhibits a few oddities with the KDE Plasma desktop. First is the popup that says “The login keyring did not get unlocked when you logged into your computer.” Since I don’t use the keyring, I followed some advice on Stack Exchange by renaming my login.keyring file to .login.keyring. After rebooting, that eliminated the keyring prompt.
Also, remotely accessing the Debian machine generates this message: “System policy prevents control of network connections.” While I can simply cancel that pop-up, it’s a bit irritating. I was able to defeat this by adding a rule to polkit, as found at the end of a thread on Stack Exchange. Specifically, I installed the polkitd-pkla package (although I don’t know if I really needed to):
sudo apt install polkitd-pklaAnd then I created this content in a file at /etc/polkit-1/rules.d/50-allow-network-manager.rules:
polkit.addRule(function(action, subject) {
   if (action.id == "org.freedesktop.NetworkManager.network-control" &&
       subject.isInGroup("sudo")) {
       return polkit.Result.YES;
   }
});
After rebooting, no more system policy messages!
Installed AllStarLink 3
Then it was time to install ASL 3. The directions are available at https://allstarlink.github.io/user-guide/install/#allstarlink-package-repo-install
If you don’t want to retype the commands, open a browser on the new Debian 12 machine and browse to the URL shown above. Then you can copy-and-paste commands into your terminal window. (In Zutty, the paste command is Ctrl-Shift-V.)
Get ASL 3 configured properly
By configured properly, I mean AllStarLink.org sees the node and Allmon3 works. I have found that specifying the node’s actual IP address in various configuration files works better for me than the generic 127.0.0.1 localhost address. After making those changes, I seem to have better luck when I reboot the machine rather than just restart Asterisk.
I also installed AllScan to help with selected AllStarLink nodes once the phone was connected.
Now for the phone
Reset and upgrade the Snom D710 phone
Out of the box, this used/refurbished desk phone was trying to provision from a server that doesn’t exist on my network. I reset the phone using this procedure:
Press * * # keys on the keypad.
Press and hold # key to reboot the phone.
Keep holding the # key until you see the Rescue Mode.
Press 1 key for a settings reset.
Press any key when prompted to reboot. The phone will be reset successfully after startup.
After waiting for the phone to reboot and setting the language and time zone, I was able to log into the phone at the phone’s IP address, using the default “admin” and “0000” as the user and password.
This phone is not like my Cisco phones. It’s going to take some time to understand how to make it dance to my tune. It doesn’t help that the Snom wiki is no longer online. The wiki had potentially useful information about configuring the Snom D710 phone for Asterisk.
Upgrade the firmware
The phone as delivered had the snom710-SIP 8.7.3.16 firmware. I found newer firmware on a 3CX site and figured out how to move the new firmware (snom710-8.9.3.96-SIP-r.bin) to one of my local machines running an Apache web server, and used that local URL to trigger the firmware update process.
Once these steps were concluded and the phone rebooted, I finally got a dial tone. That’s progress.
Configure the phone
You configure the Snom D710 phone through the IP address of the phone. I usually look for a new device on my home network using Advanced IP Scanner.
In the D710 configuration interface, under Settings, I selected Identity 1. Here’s what that looks like in my implementation:
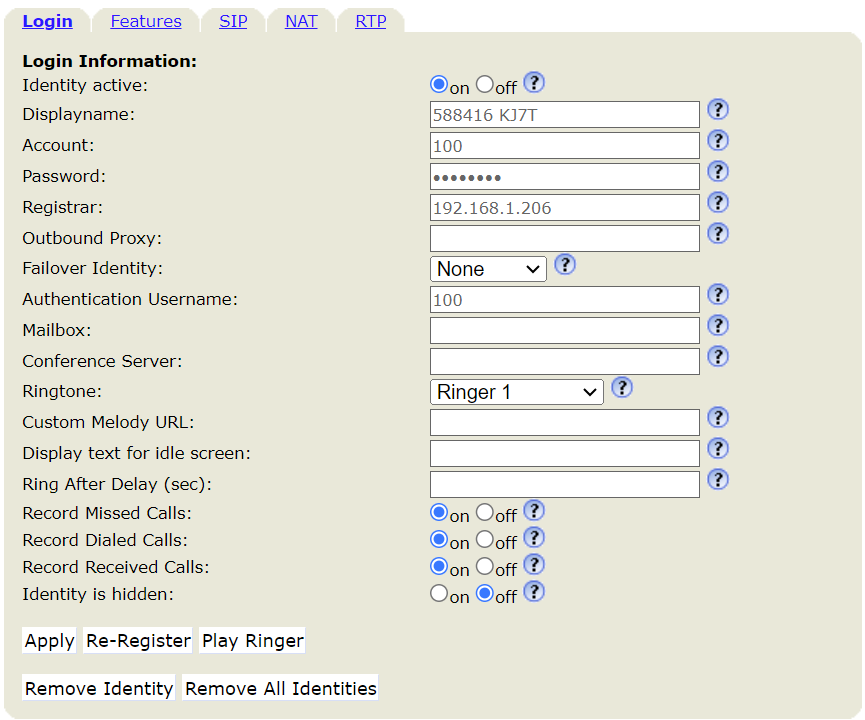
Note the Account entry and the Authentication Username entry. Those show up below as $PHONEUSER (a variable I added) in ASL3.
In the same screen, select the SIP tab and at the bottom, select Asterisk for Server Type Support. I don’t know if this is necessary but that’s what I did.
If you’d like a speed dial set where you just push a line button to dial the node, you can do that in Setup, Function Keys:

In the Number field, here’s what works for me (where the IP address is the IP for the ASL3 node):
<sip:2000@192.168.1.206:5060;user=phone>If you don’t want to use the speed dial button, you would enter 2000 on the phone’s keypad and press the checkmark on the phone (just left of the round multifunction control) to call your ASL3 node.
Configuring ASL3 for a SIP phone
The fundamental guide to configuring a SIP phone to work on AllStarLink 3 is found at: https://allstarlink.github.io/adv-topics/sip-phone/#update-modulesconf. Be sure to follow the steps outlined there, including modifying the /etc/asterisk/modules.conf file.
Unfortunately, those instructions did not work for me when I configured my node 588411 to connect to my Cisco 525G desk phone, and they didn’t work when I configured node 588416 to connect to the Snom D710 phone.
I did get it to work but the explanation is involved and a bit obscure, hence publishing this as a TechNote. In this format, the information is available but is not being pushed into a few thousand email inboxes.
extensions.conf
This section (placed just above the last line in /etc/asterisk/extensions.conf) is the part where the stock code in the AllStarLink guide failed me.
The stock code that did not work for me is:
[sip-phones]
exten => 1001,1,Dial(PJSIP/${EXTEN},60,rT)
exten => ${NODE},1,Ringing
exten => ${NODE},n,Answer(3000)
exten => ${NODE},n,Set(NODENUM=${CALLERID(number)})
exten => ${NODE},n,Playback(extension)
exten => ${NODE},n,SayDigits(${NODENUM})
exten => ${NODE},n,Playback(rpt/connected)
exten => ${NODE},n,Playback(rpt/node)
exten => ${NODE},n,SayDigits(${EXTEN})
exten => ${NODE},n,rpt(${EXTEN}|P)
exten => ${NODE},n,Hangup
My static code that did work in my implementation looks like this:
[sip-phones]
exten => 100,1,Dial(PJSIP/2000,60,rT)
exten => 2000,1,Ringing
exten => 2000,n,Answer(3000)
exten => 2000,n,Set(NODENUM=2000)
;exten => 2000,n,Playback(extension)
;exten => 2000,n,SayDigits(${NODENUM})
exten => 2000,n,Playback(rpt/connected)
exten => 2000,n,Playback(rpt/node)
exten => 2000,n,SayDigits(588416)
exten => 2000,n,rpt(588416|P)
exten => 2000,n,Hangup
In the above code, 100 is the user id that is entered in the phone configuration as the authorized user. Your phone config may use a different term. You want this to be the user that has a password set in the phone config.
In my code above, 2000 is the number I dial from the phone to reach the ASL3 node.
To generalize what I did (and clean up a few errors), I added two new variables at the top of the extensions.conf file:
[globals]
HOMENPA = 999 ; change this to your Area Code
NODE = 588416   ; change this to your node number
PHONEUSER = 100 ; This is the auth user on your SIP phone
DIALNODE = 2000 ; This is what you dial to reach your ASL node
And then in the [sip-phones] section, all of those static settings are now pulled in from the $PHONEUSER and $DIALNODE variables:
[sip-phones]
exten => ${PHONEUSER},1,Dial(PJSIP/${DIALNODE},60,rT)
exten => ${DIALNODE},1, Ringing
exten => ${DIALNODE},n,Answer(3000)
exten => ${DIALNODE},n,Set(NODENUM=${NODE})
;exten => ${DIALNODE},n,Playback(extension)
;exten => ${DIALNODE},n,SayDigits(${NODENUM})
exten => ${DIALNODE},n,Playback(rpt/connected)
exten => ${DIALNODE},n,Playback(rpt/node)
exten => ${DIALNODE},n,SayDigits(${NODE})
exten => ${DIALNODE},n,rpt(${NODE}|P)
exten => ${DIALNODE},n,Hangup
This works for me. As a variation, you could set the $DIALNODE variable to be your node number. That way, you’d just dial your node number to access the node. (Tested, it works. I changed the $DIALNODE variable to 588416 in extensions.conf and restarted Asterisk. Then I changed the speed dial button in the phone to dial 588416@192.168.1.206. Pressing the speed dial button dials node 588416, it shows 588416 in the display, and tells me it is connected to 588416.)
pjsip.conf
In the /etc/asterisk/pjsip.conf file, in the section marked “ENDPOINT CONFIGURED FOR USE WITH A SIP PHONE,“ you set the number for the auth phone user (in my case, that is 100).
[100]
type=endpoint
transport=transport-udp
context=sip-phones
disallow=all
allow=ulaw
allow=alaw
allow=gsm
auth=100
aors=100
callerid="KJ7T"

[100]
type=auth
auth_type=userpass
password=[your password here must match what is in the phone config]
username=100

[100]
type=aor
max_contacts=4
I also set /etc/asterisk/rpt.conf settings to match the ASL3 settings recommended by David Gleason NR9V at https://allscan.info/docs/diy-node.php, specifically:
rxchannel = Radio/[node#] ; Comment out all other rxchannel lines*
duplex = 3         ; Full-duplex, do not repeat Rx audio to Tx audio
hangtime = 100
althangtime = 100
;linkunkeyct = ct8 ; Comment out to prevent courtesy tones when connected
holdofftelem = 1
telemdefault = 0   ; Prevent "node X connected to node Y" messages
parrotmode = 1     ; 1 = Parrot On Command
;Uncomment following lines:
921 = cop,21       ; Enable Parrot Mode
922 = cop,22       ; Disable Parrot Mode
Also per David’s instructions, /etc/asterisk/simpleusb.conf settings should look like this:
rxboost = 0
carrierfrom = usbinvert
ctcssfrom = no
plfilter = no
txmixa = voice
txmixb = no
duplex = 1                ; ASL2/HV only, not needed in ASL3
clipledgpio = 1           ; Supports ADC Clip LED
legacyaudioscaling = no
Once all of those changes are saved, it’s time to restart Asterisk. You can use the batch file in ASL3:
sudo astres.shOr you can you systemctl:
sudo systemctl restart asteriskOnce Asterisk has restarted, I suggest starting the Asterisk CLI before trying the phone. Do that in a terminal like this:
sudo asterisk -rvvvWatching error messages as your phone attempts to connect with ASL3 will be very informative. This is the key step that helps me track down exactly what I didn’t get right in the configuration. (When you are done with the Asterisk CLI, just type “exit” [no quotes] and hit Enter.)
Controlling the ASL3 node
In this implementation, I prefer to use David Gleason’s AllScan program. AllScan makes it easy to see your favorite nodes, whether they are active, and to connect/disconnect from the nodes you’ve saved.
DTMF tones on the Snom D710 are problematic. There is a known bug where phones lose their ability to produce or use DTMF tones. In some cases, that bug is resolved for a time by restarting the phone. To restart the Snom D710, enter **## from the keypad. While this did successfully restart my phone, DTMF commands still did not work.
Similarly, DTMF commands issued through AllScan did not work. I watched the Asterisk CLI as I issued DTMF codes and the node doesn’t hear them. (It turns out that this may be by design. People smarter than me are concluding that parrot mode is not enabled for SIP phone connections. More on this as I learn more!)
This is another reason why AllScan is my preferred way to control a node connected to a SIP phone.
Closing thoughts
I like the idea of setting the $DIALNODE variable to be the ASL3 node number. That just makes sense.
And since I use voip.ms as my Voice-over-IP vendor, this article seems worth exploring: Giving Your ASL3 Node a Phone Number - Setting Up Autopatch and Reverse Autopatch using VoIP.ms
I’m hoping someone can actually script some ways to do this. Using a SIP phone is a very inexpensive way to interface with an ASL3 node. I’ve found the audio quality to be quite good. The problem is it is confusing to most of us. A script that would accept certain values and place them in the appropriate ASL3 configuration files would be very helpful.
My old Cisco SPA525G phone reboots itself a couple of times a day. I find it a bit disconcerting to glance over at the phone and see it is offline while it is rebooting. Since I had a good purchasing experience with Bargain IT, I ordered a Polycom VVX 401 12-line phone to use as a replacement for the 525G. I chose Polycom because it has just as good a reputation as Cisco (in my experience) and the VVX 401 is an endpoint supported by Hamshack Hotline. It should also work well with the couple of different voip.ms phone numbers I have.
Addendum: Configuring a Polycom VVX 401 SIP phone
I also had a Polycom VVX 401 SIP phone on hand, so the next day, I configured the Polycom to also work on node 588416. I’ll get my notes cleaned up in a few days and add the configuring steps to this TechNote. For now, I’ll just say that the Polycom configuration interface is very different from my Cisco phones, and very different from the Snom D710 phone. It took a while to figure out how to get the SIP line to register with the node!
The phone I received had an unknown password set, so I had to find out how to reset the phone. Find that information at https://dotvox.com/guide-how-to-reset-a-polycom-vvx-series-phone/
How to access the web configuration utility: https://helpdesk.telebroad.com/support/solutions/articles/4000151745-poly-vvx-401-410-web-configuration-utility-access-and-troubleshooting

I got quite stuck for a few hours with a failure of the phone to register with Asterisk. Again, running the Asterisk CLI (sudo asterisk -rvvv) gave me the clues I needed to figure out the phone registration problem: Asterisk was simply not seeing the phone, meaning there had to be a setting somewhere that let me specify the phone’s address. I finally found that in NAT settings. This is found under Settings, Network, NAT. The IP address 192.168.1.179 is the address of the Polycom phone.

My SIP settings look like this:

The outbound proxy and Server 1 settings are shown below. IP address 192.168.1.206 is the address of my node.

For Settings, Lines, Line 1:

Authentication, Outbound Proxy, and Server 1 settings for Line 1 are:

I hope this information proves useful to others seeking to configure a Polycom phone for AllStarLink 3.

Tom, i would really thank you for the support and helping us in this configuration!
Regards
73 de iz0pqe