Random Wire Review 95: June 21, 2024
New Meshtastic node with rotary encoder! Updating your Hamshack Hotline number. ASL while mobiling. Testing phone service. Report on the XHDATA D808 radio. David Gleason and WorldRadioHistory.com.
Contents
0. Last-minute Notes
1. Meshtastic Node with Rotary Encoder
2. Base Station Meshtastic Node
3. How to Manually Change your Hamshack Hotline Number on the Cisco SPA525G
4. AllStarLink While Mobiling
5. Testing a New Phone Service
6. XHDATA D808 Radio
7. David Gleason and the World Radio History Website
8. Closing Notes
0. Last-minute Notes
NOTE 1: Affiliate links for some products are available on the Support page. I’m not including the Support page link elsewhere in this newsletter because it just seems a bit much. If you are interested, please visit the Support page!
NOTE 2: Thank you to Ken for the coffee! Subscriber support is always appreciated very much. I’m a fan of free content and voluntary support when the spirit moves you.
NOTE 3: I had a long drive from Portland, Oregon to Burlington, Washington on Sunday and returned on Tuesday. I had the best company for both legs of this trip: I listened to Ham Radio Workbench 211 on the way to Burlington and Ham Radio Workbench 212 on the way back to Portland. For me, the Ham Radio Workbench Podcast is one of the highlights of being in our amateur radio community. I enjoy the content and how it is shared. Even my spouse (who is not a ham) enjoys the banter and passion voiced in the podcast. Random Wire Recommended!
NOTE 4: It was great to hear an interview with my home club president, Ben Hicks AB7I, by KMAS radio. Hear the 13-minute interview with Ben about Field Day at https://share.transistor.fm/s/632f251b.
NOTE 5: It’s Field Day time! I’m going to try to visit the Hoodview Amateur Radio Club’s site on Larch Mountain, east of Portland, Oregon. If time permits, I’ll make the run up to Shelton to visit my “home club” (Mason County Amateur Radio Club) friends who will be set up between Highway 101 and the Sanderson Field.
NOTE 6: I’m starting to fiddle with podcasting. As I get this up and running, I’ll be posting audio previews of upcoming issues of the Random Wire. That’s not my end game, though — I’d like to include audio from different radio exchanges and modes so folks can actually hear what these systems sound like. The podcast will be available on Substack and can be found on Spotify and several other services.
1. Meshtastic Node with Rotary Encoder
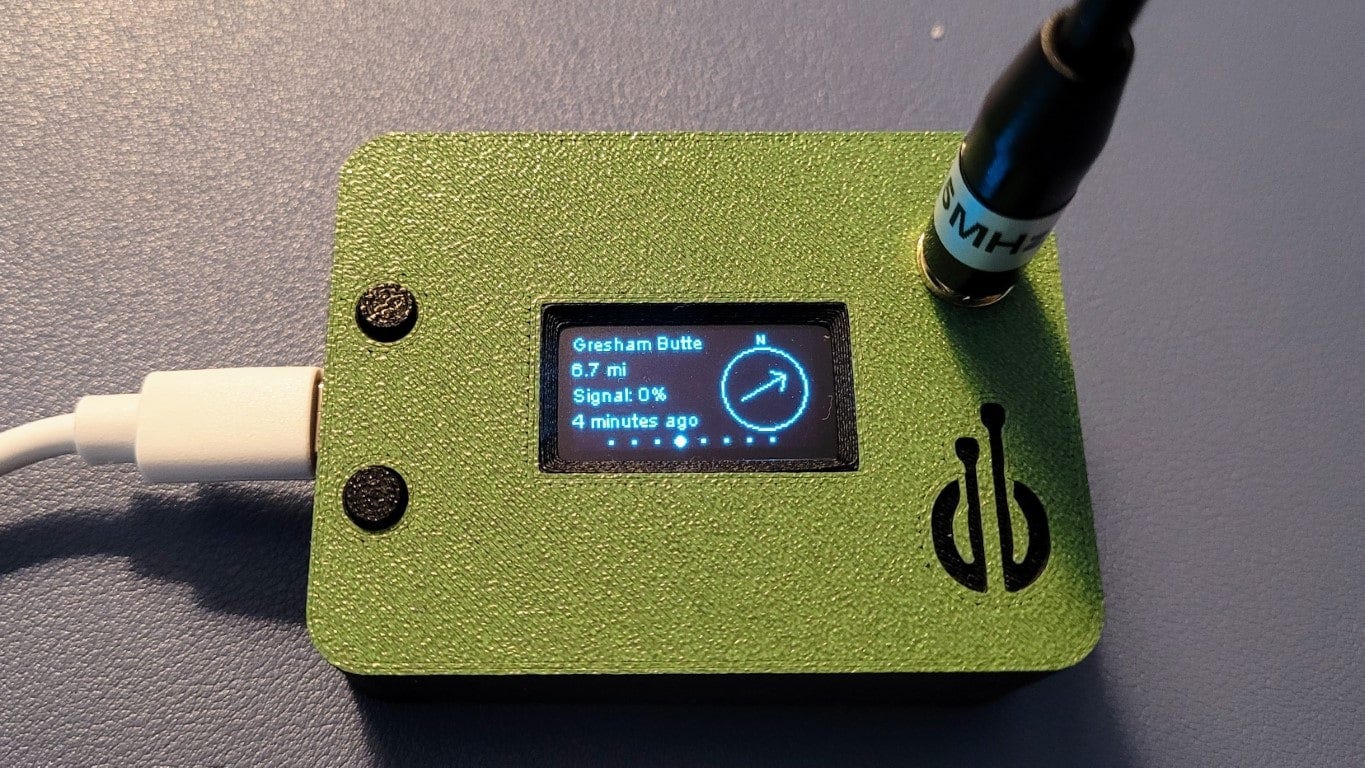
This device finally looks like something that could be useful without a smartphone. I bought it because the rotary encoder allows me to set some pre-made (“canned”) messages. To reply to a message over Meshtastic, one selects the desired reply from that set of messages. No phone needed.
I can envision a couple of these being useful on trail hikes, SOTA activations, boating, and other outdoor activities. Of course, it also works in conjunction with my cell phone via Bluetooth, but that’s a given.
Unlike most of the Meshtastic devices I’ve purchased, this one has a GPS module. That is a necessary feature for a node that can communicate without using your smartphone’s GPS.
Using a Heltec board, plus having a GPS module running, power consumption seems a bit higher than most of my other nodes. Combined with the limited capacity battery, I’m not getting the battery life I’d like to see. This is easily remedied with a small USB power bank.
The seller operates the LayerFabUK store on Etsy. Shipments come from northern Scotland, but that has not been a problem. Shipments have only taken 10 days to two weeks to get to Oregon.
I think my next Meshtastic experiment will be a bigger jump forward, in the form of a Meshtastic T-Deck Lilygo with GPS. I can test sending and receiving messages by using my node with the rotary encoder with the T-Deck.
2. Base Station Meshtastic Node
While I was at it, I picked up a node without a battery. This runs from a USB-C power supply. I feel much more comfortable keeping this running unattended at home because it has no lithium ion battery inside. I run this node around the clock at home as a router-client. It is very lightweight so a small piece of reversed blue painter tape keeps it secure on the shelf.
This was sourced from the OVVYS shop on Etsy for $52. Note: I replaced the stock stubby antenna with a longer 915 MHz antenna.
3. How to Manually Change your Hamshack Hotline Number on the Cisco SPA525G
About a month ago, the Hamshack Hotline folks announced the end of 10-digit calling numbers. These numbers are shrinking to seven digits. But what do you do if you have a 10-digit number already? That’s my situation with my Cisco SPA525G phone!
HH suggests re-provisioning the phone. Nope, not going to do that. I have way too many things programmed into my phone. I thought there must be a manual way to update the HH information without affecting my other lines and one-button shortcuts. The procedure I followed should be similar for other Cisco phone models.
For those who prefer a video walkthrough on how to update your number on a Cisco SPA525 phone, Vince VE6LK has just the thing. I wasn’t aware of Vince’s video when I wrote my instructions (such is the downside of preparing written content a few weeks prior to release), but since the process is not hard, what I came up with meshes very nicely with what Vince did. Great minds and all that ;-)
For the Cisco SPA525G phone, here’s how to manually update your 10-digit HH number to bring it in line with the new seven-digit system before the end of June 2024.
I encourage you to backup your configuration before making any changes to your Hamshack Hotline instance. HH recommends you re-provision your phone. I chose not to do this because I have five lines in use on my phone, plus numerous programmed buttons off to the side.
To save your phone’s configuration, access the web interface for the phone, then click Admin login. The URL should look like http://your-phone-ip-address/admin/ once you are there. Add spacfg.xml to the URL, i.e., http://your-phone-ip-address/admin/spacfg.xml, then press Enter. You’ll probably see your browser screen fill up with gibberish for a moment, then it should resolve to show a nicely formatted XML file. Click File, Save As, and save the spacfg.xml file to your computer. Now breath a sigh of relief because you have saved a copy of your phone’s current configuration. This means if you fumble finger the changes, you can revert to your prior working configuration and try it again.
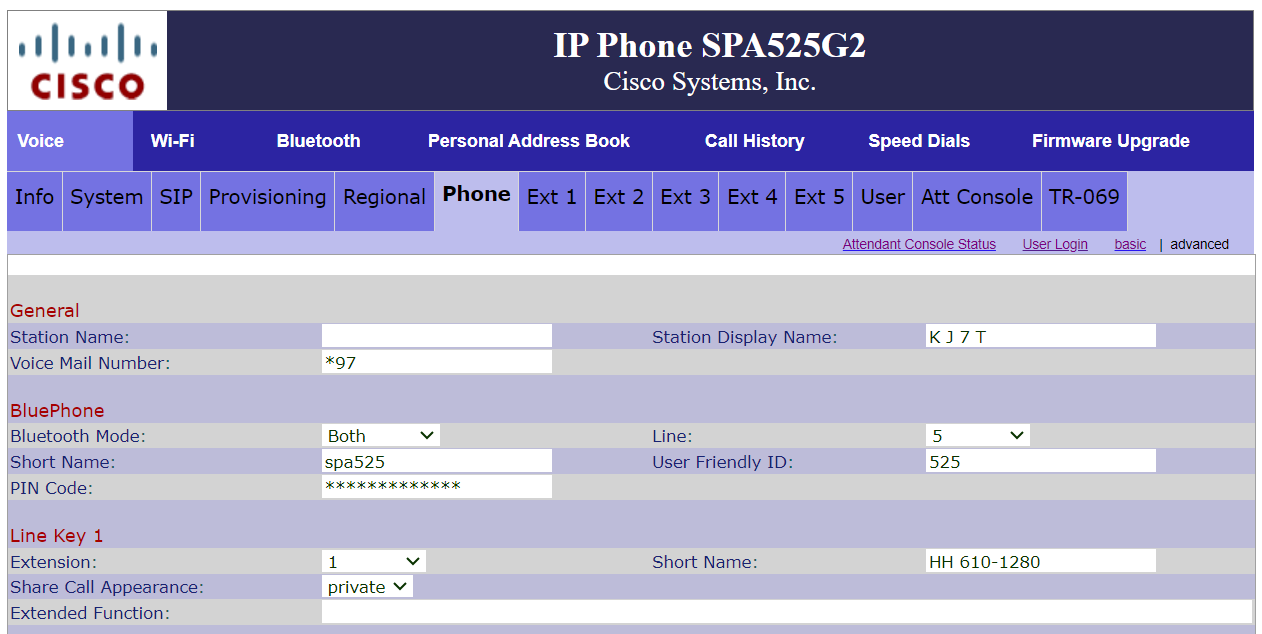
To manually change settings, you’ll want to change how the HH number is displayed on the phone and how it authenticates to the HH system. To change the display, you should be logged into the Admin interface as described above. Then click the Phone tab. I have my HH number on Line Key 1, so find that section and change the information in the Short Name field as you wish.
Line Key 1 is extension 1, so now click the Ext 1 tab and scroll down to the Subscriber Information block. Change the Display Name settings as you wish.
Now change the User ID from your 10-digit HH number to your new 7-digit HH number (no dashes or spaces). This changes how your phone authenticates to the Hamshack Hotline system. When you have made these two changes (Short Name and User ID), scroll to the bottom of the page and click the Submit All Changes button.
At this point, your phone should reboot and (hopefully!) your new settings are now active. It’s a good idea to test your phone after making changes. Don’t forget to update your HH number in other places if you have included it on a website, signature, or other resource.
4. AllStarLink While Mobiling
For this exercise, I used my new SHARI PiZeroU node from Kits4Hams because it is small. If you are not interested in this content, skip down to Testing a New Phone Service. I have quite a few screenshots in the AllStarLink While Mobiling section so it is a bit long and tedious if it is not something you are interested in. Note that this same configuration will work not only when you are driving but also in a hotel room.
Essentially, I tethered my cell phone to the PiZeroU but there's a twist because the PiZeroU doesn't have an obvious Ethernet port. However, one of the two microUSB ports also functions as an Ethernet port with the correct USB-to-Ethernet adapter.
That still didn't get me quite where I wanted to go, so I picked up a short adapter cable to convert the Ethernet connection to a USB-C plug that goes into my phone. Then I enabled Tethering in the phone and powered up the SHARI node.
Once the node was booted up, I could easily use my handie-talkie to connect. However, since I was mobile, it was more convenient to use the mobile radio. I added a memory in my Yaesu FTM-300DR to connect to the node at low power. With the DTMF microphone in hand, I could easily connect and disconnect from nodes. Audio quality was very good as long as I had a good cell signal.
However (and there always seems to be a however!) this was actually a bit clunky in practice. It’s a bit awkward to manage the multiple bits of gear and connections:
What I really do is use my phone as a hotspot. It is easier and works fine. To set this up, I added my phone’s wifi information to the SHARI node. Translation: I added a second wireless network to my node’s wpa_supplicant.conf file.
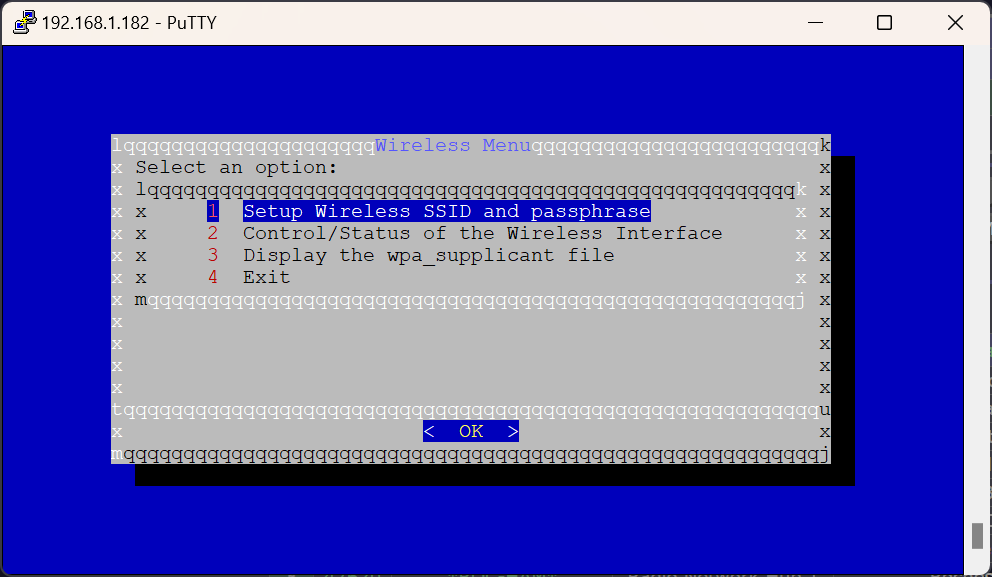
With two networks in the file, the node will look for the one at the top of the file first. If it doesn’t find it, it will then look for the next entry. My top entry is my home network and the second entry is my cell phone in hotspot mode. What this really means is once set up this way, the node automatically picks my phone as the network when I’m in the vehicle.
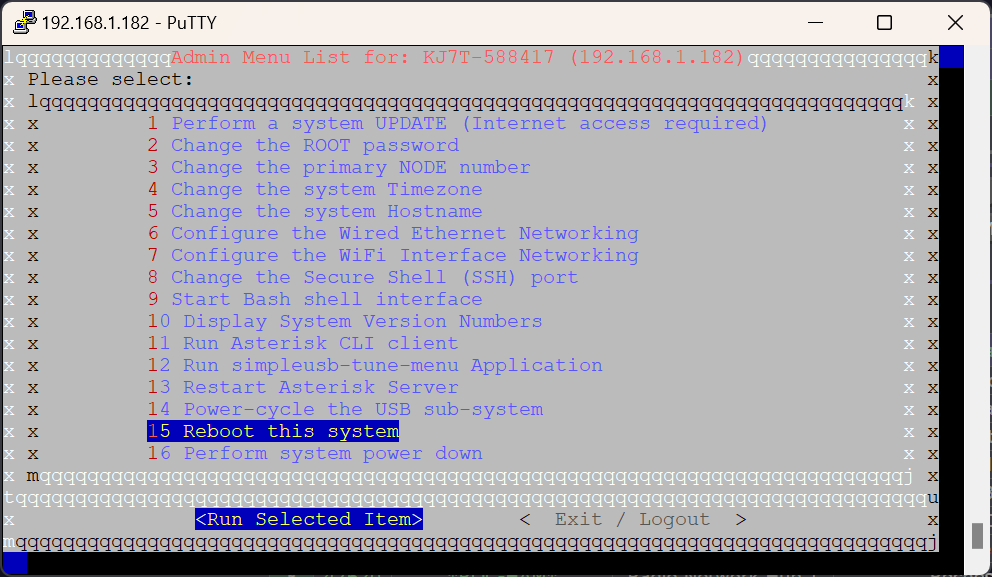
Then select the setup option:
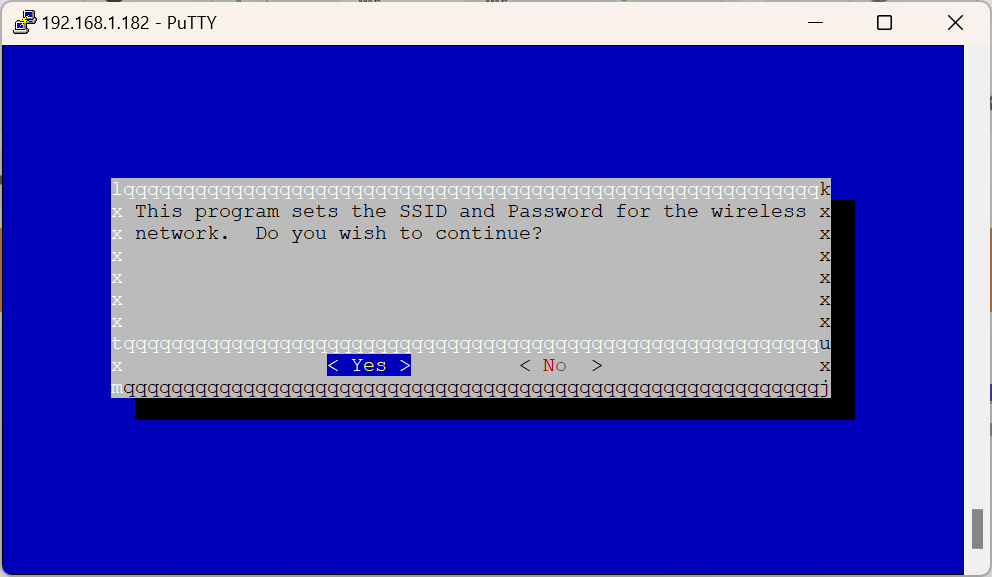
When you click on OK, you’ll be presented with some choices. The first is a sanity check: are you sure you want to do this?
When you answer yes to continuing, you’ll be asked if you want to clear the existing file contents (i.e., start over on configuring wifi) or not. Since we are adding a second wifi network to the file, we select No.
And this brings up another sanity check to make sure you are really doing what you intended. We click OK.
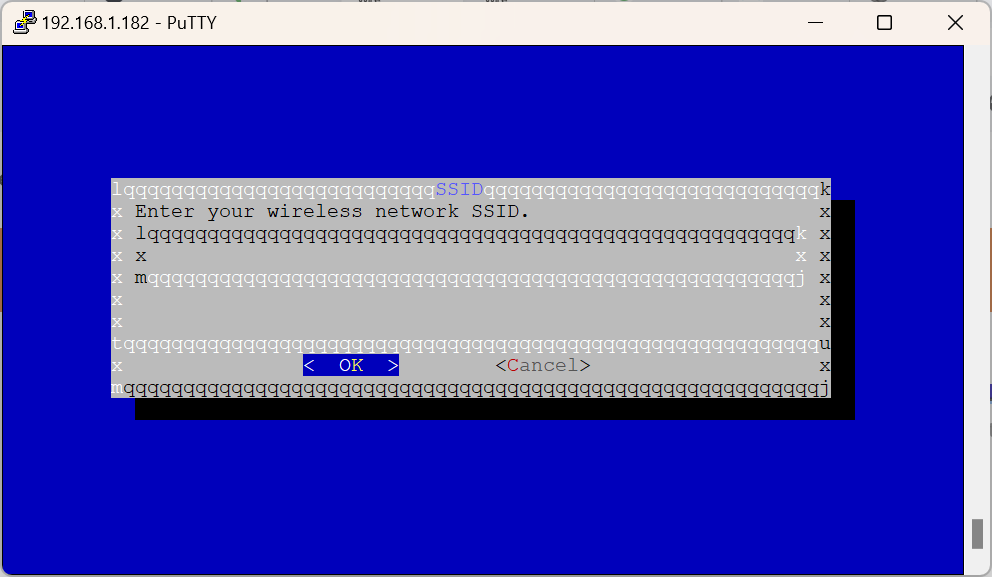
At this point, you get a slightly veiled choice. You are asked if you want to manually enter the SSID. That’s what I did because it wasn’t very difficult. If you answer Yes, you will get the input screen. If you answer No, you’ll be presented with a screen that shows available access points.
Here’s what that data entry form looks like. You’ll enter your SSID of the wifi network and press OK, then you’ll get another screen where you enter the password for the network.
Once you’re done, it’s a good idea to take a look at your wpa_supplicant.conf file.
Mine looks like this (I’ve hidden the passwords). By viewing the file, you can confirm that both wifi networks are now present.
And finally, I always reboot the system after making a significant change. I doubt that I need to do this, but there are a lot of invisible moving parts in this little system and I like to know that I’ve given all those bits a chance to mesh correctly.
If you chose not to enter the wifi network information manually, you’ll see the screen that says it is scanning for available networks:
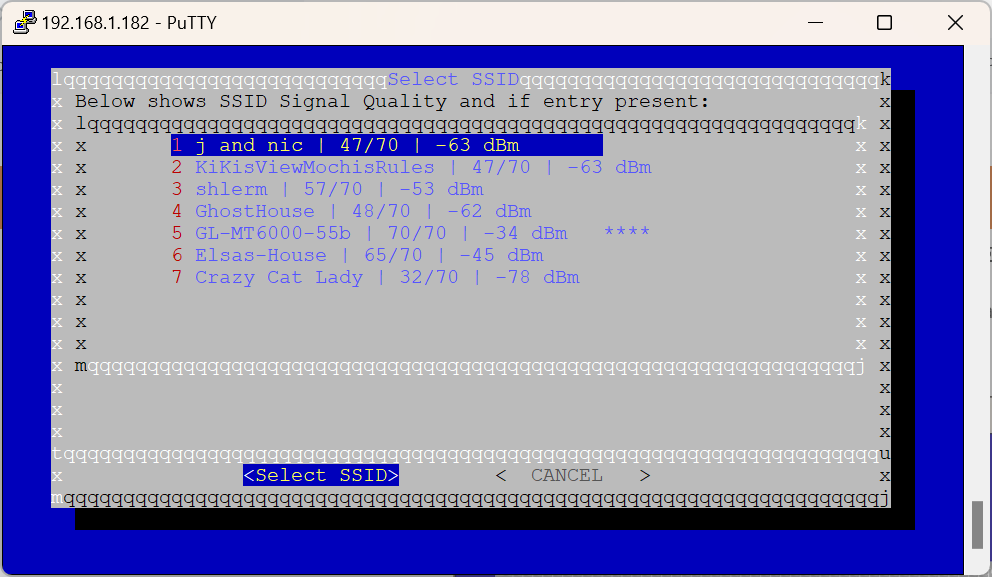
After a brief delay, you’ll be presented with a list of available networks. Where I live, that list looks like this:
If you are using this method of selecting the network, after selecting the SSID, you’ll get a screen asking for the network password.
In summary, to operate mobile with your AllStar node, you can physically tether your node to your cell phone or you can configure the node to automatically select your phone as the wireless network (once you put the phone in hotspot mode). I hope this content helps the subset of us who like to use AllStar while traveling.
5. Testing a New Phone Service
In May, T-Mobile announced it was raising prices for some legacy plans. I haven’t seen that price increase in my bill, but while investigating this, I discovered that a hotspot that I reported as “lost or stolen” in January has continued to be on my monthly bill. I was told at the time that $50/month charge would come off my bill. It did not. When I inquired, I was informed that they had suspended the line and per policy, continued to charge the monthly fee.
Color me a bit unhappy to have paid $300 over six months for a device I no longer have and cannot use. No relief was offered. This is not the way T-Mo used to operate. Just a handful of years ago, customer service was very flexible in making sure customers were happy. I am not particularly happy now.
So it is time to shop. I use voice, data, and text. Sometimes I use my phone as a hotspot. I am probably above average in data use but my consumption is not extreme. I don’t watch movies or play games on my phone.
Given this kind of use profile, I went looking for unlimited voice, data, and text. I looked online for advice and found some helpful experiences on Reddit that persuaded me to give US Mobile a try.
I have a Google Pixel 4a that can use two SIMs (one eSIM and one physical SIM). I ordered a a discounted three-month plan (US Mobile is a pre-paid provider) for $45 that includes a free starter kit and paid $2 extra for rush delivery.
Since I’m on T-Mo for my main number, I planned to test the US Mobile service on the T-Mo network, thinking this would give me a real-world comparison to “real” T-Mobile service. But that’s not what I did. I selected the “Warp 5G” network which is really Verizon, not T-Mobile. (The “GSM 5G” network is T-Mobile and includes some international time but I don’t travel internationally; the Warp 5G is Verizon and claims it offers priority data which might be useful in crowded places.) The Unlimited Starter plan costs $23/month ($276/year) which is a fraction of my three-line T-Mo bill.
The SIM card should arrive before this issue of the Random Wire is published, so I may have a few very early thoughts below as an update.
The SIM card arrived and I configured the phone late Tuesday night. In so doing, I got a chance to test US Mobile’s customer service because the activation process did not go smoothly. The directions in the starter kit told me to download the app to the phone I was going to activate and to follow the instructions there. Well, those instructions started walking me through setting up a new activation, including paying for it. But I had already done that.
Customer service, via chat, suggested I go to the website and log in. I did that. However, I couldn’t find the activation instructions because the service agent misdirected me to a different menu. I finally found those instructions on my own and selected a new phone number for the phone.
In the mobile app, one instruction was to activate, then insert the SIM card. The website said to just insert the SIM card and I’d be done. I asked support what to do and waited…and waited…and then support asked: “Have you successfully activated yet?”
I gave up waiting, turned off the phone, broke out the nano SIM card, and installed that to the phone. Once I turned it on, it took about a minute before the phone found the cellular network. At that point, I had service on the Verizon network with my new phone number.
So far, so good. The next day, we went out to dinner and I put my T-Mobile phone beside the US Mobile phone. The T-Mo phone had full bars on 5G and the USM phone had 4 bars on LTE. That, of course, is going to vary by location. I tested them side-by-side by loading Facebook, then loaded Google News, then loaded CNN. My T-Mo phone loaded about half a second faster than the Pixel, but that reflectedthe difference in cellular network where I was located and the slight difference in processing speed of the phones. There were no hiccups and service has been continuous since I activate the USM SIM.
Right now I’d give USM an A for cellular service and a B for customer support. Most of us aren’t going to need much customer support, so personally, I put more weight on the quality and distribution of cellular coverage. I anticipate switching my family plan from T-Mo to USM by the end of the three-month trial.
6. XHDATA D808 Radio
As promised last week, here is more information about the XHDATA D808 radio. It arrived the night before issue 94 was published so I only hinted a bit about it last week.
The radio came in a brown cardboard box. Inside that was the retail box cover as shown above. Inside that was a white cardboard box as shown below, with the radio wrapped in bubble wrap and foam wrap. In other words, it was protected by multiple layers of material.
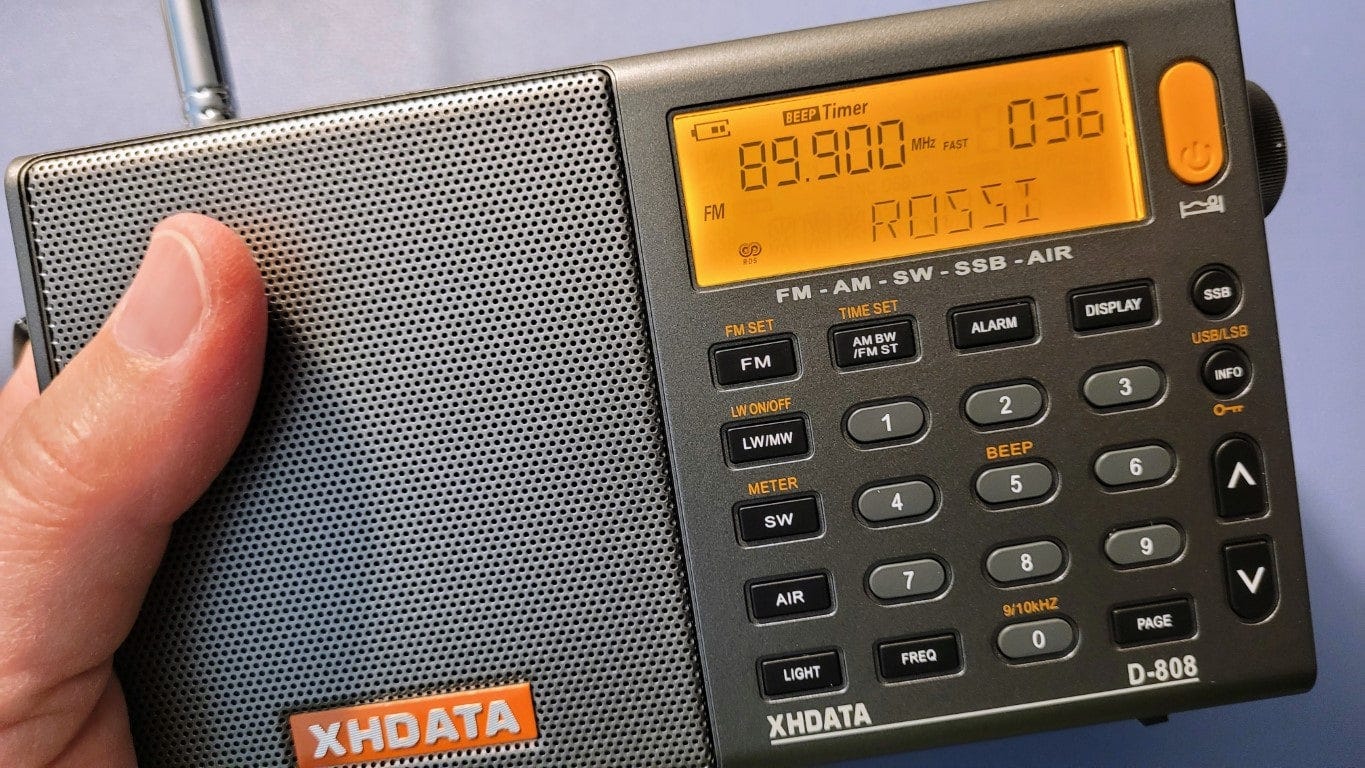
The D808 in hand feels very nice, rather like the Tecsun PL680 Portable Digital PLL Dual Conversion AM/FM/LW/SW and Air Band Radio with SSB I purchased a year ago for about $36 more than the cost of the XHDATA D808. (Yes, this means I now have two radios that do much the same thing! The D808 will live in the travel trailer and the PL680 will be at home or in my luggage when I travel.)
Accessories include a brief manual, a leatherette carrying pouch, a USB cord for charging, and a wire antenna that plugs into the 3.5mm external antenna jack.
A major selling point for me is the use of a standard 18650 battery.
As I write this, my spouse is using the D808 to listen to classical music on a local FM station. Using it on the Air band was simple: push the AIR button then hold the up arrow until the radio begins to scan the frequency range. When it hits the top of the frequency range, it stops scanning. Then hold the down arrow down until it starts scanning. Rinse and repeat. Other bands work the same way.
I only have two negatives to share about the D808. First, I wasn’t aware the wire antenna came with the radio. It was not listed in the “included components” in the Amazon listing, but upon review, I see it listed in the accessories a bit farther down the page. Chalk that up to buyer inattention.
The second item is that I’m not sure the lithium ion battery is protected. If you choose to replace the battery, it’s a 18650 Li-ion battery with a button end, not the flat end. You might already have one of these in your kit somewhere.
7. David Gleason and the World Radio History Website
You may not know about the World Radio History website. Find it at https://worldradiohistory.com.
I became aware of it because of interactions I’ve had with David Gleason NR9V about AllStarLink. He developed a nifty bit of software that makes it easy to keep a list of favorite AllStarLink nodes, but more than that, it shows you which nodes are active. His AllScan software runs on both kinds of nodes in my collection: those that run on AllStarLink and those that run on the HamVoIP distribution.
David encouraged me to try building an AllStar node, even when I was demonstrably awful at soldering. I came close to succeeding but eventually bought a device from him that runs my always-on node 588412. I have continued to appreciate his kindness and mentorship as I worked to improve my skills.
Since then, I’ve learned a bit more about David’s history. He has built one of the most amazing collections of curated radio history. I commend the WorldRadioHistory website to you. Amateur radio operators may wish to start by checking out old publications at https://www.worldradiohistory.com/Home-DX.htm. There you will find scans many old journals such as 73 Amateur Radio Magazine and even The Modulator, the ARRL’s journal in 1923.
There is so much to discover on the World Radio History site that I feel like it should come with a cautionary note:
WARNING! YOU MAY LOSE TRACK OF TIME!
The Library of American Broadcasting Foundation (LABF) has honored David with the inaugural Excellence in Broadcast Preservation Award for his work to preserve broadcast history. What an incredible treasure trove of radio history. Well done, David!
8. Closing Notes
8.1 WIRES-X audio device not found
My WIRES-X Portable Digital Node has been operating very well, but I continue to have occasional problems with the audio device:
Not found the Audio device for the WIRES-X use.
I described this issue here and here in issue 93. As a reminder, I’m running the WIRES-X software on my under-desk server, which I administer from other computers. WIRES-X is forgetting there are audio devices plugged into the computer.
The workaround that is working for me is to reboot the server but I don’t like doing that. Most of the time, if I physically connect a keyboard, monitor, and mouse to the server and then restart WIRES-X directly on the server, WIRES-X finds the audio device and I’m good for two or three days. I tried going through these steps by remoting in from another computer but that doesn’t work. I’ve got to be “on” the real computer that WIRES-X is running on.
After the audio device is found again, I disconnect the keyboard, monitor, and mouse and use WIRES-X remotely…until the audio device is again not found.
8.2 Microphones redux
I’m back to using the Blue Yeti Nano microphone as my daily driver on Zoom and Teams calls. The videoconferencing software seems to do a remarkable job of filtering out background noises. Using the cardiod pattern on the microphone, I’m getting good reports of audio quality from others.
I did try using the Audio-Technica 2005 USB/XLR microphone on my proof-of-concept podcast recording but it picked up every hissy sibilant in my speech. Next time, I’m going to try the Nano, hung upside down above my mouth, with the “dead cat” wind/pop filter. As long as I can choose a quiet time for recording, the sensitive Nano should work fine.
Thank you to current, new and future subscribers! 73 to all,


