

TechNote: Connecting a SIP Phone to a ClearNode
TechNote-7, March 14, 2025: How to configure a ClearNode based on HamVoIP/ASL2 to connect to a SIP phone. #technote

TechNotes available
TechNote 4: Configuring DVSwitch Mobile for your AllStar node
TechNote 6: Using the Groundwire Softphone with Hamshack Hotline
Version of ClearNode
I’m using a ClearNode by Node-Ventures.com which uses the HamVoIP flavor of AllStar. I bought this ClearNode Pi 4B 2GB - UHF in September 2022. It is running on an AllStarLink version 2 base, not the more modern ASL 3. I state this information here so you will not try to follow this guide if you have a ClearNode that is running ASL 3. If you have an older ClearNode running HamVoIP based on ASL 2, this guide is for you.
Files to edit
You’ll need to edit three files:
/etc/asterisk/modules.conf
/etc/asterisk/sip.conf
/etc/asterisk/extensions.conf
The basic instructions I followed were provided a few years ago by K6LCM and the Santa Barbara Amateur Radio Club. Refer to their guide at this link: https://www.sbarc.org/2023/08/28/accessing-allstarlink-from-a-sip-telephone/
Once your node is configured and restarted, and you’ve added the necessary information to your SIP phone, dialing your node number should connect your phone to your ClearNode.
First, configure your ClearNode
What you’ll need to do is log into your ClearNode over SSH to open a terminal window. Then you will enable SIP in the modules.conf file, add an extension number to the sip.conf file, and provide dialing instructions in a new context in the extensions.conf file.
When you add the extension number in sip.conf, you’ll also specify a context (in this example, the context is “sip-phones”). That context is called from the extensions.conf file, which is where you’ll add dialing instructions for your node. (That extension number is also used as the user name or identity when you configure your SIP phone.)
Step 1: Locate and edit modules.conf
This is located at /etc/asterisk/modules.conf. I use nano to edit:
sudo nano modules.confChange “noload” to “load” for chan_sip.so. I found this line at the very end of the modules.conf file.
noload => chan_sip.so ; Session Initiatian Protocol (SIP)Delete the “no” from “noload” and then save the file. (In nano, press Ctrl X and answer Y to save the file.)
load => chan_sip.so ; Session Initiation Protocol (SIP)
Step 2: Locate and add code to sip.conf
I commented out the default stanza at the top of the file by adding a semicolon to the beginning of each line. Then I added a section titled [501], making this extension 501 on my phone.

If you want to copy this, use the following code block and then edit the secret and the callerid.
[501]
deny=0.0.0.0/0.0.0.0
secret=your-secret-password-here
dtmfmode=rfc2833
canreinvite=no
context=sip-phones   ; This is the context you'll use in extensions.conf
host=dynamic
trustrpid=yes
sendrpid=no
type=friend
nat=no
port=5060
qualify=yes
qualifyfreq=60
transport=udp
encryption=no
callgroup=
pickupgroup=
dial=SIP/578490
permit=0.0.0.0/0.0.0.0
callerid=KJ7T
Again, save your edited file.
Step 3: Locate and edit extensions.conf
This is where you’ll add the “sip-phones” context you specified in the sip.conf file above. I added the new sip-phones section below the already present [allstar-sys] context.
You will need to change my node number 578490 to your node number. Also note the lines with “digits” in them. You’ll need to change the individual numeral in those lines to match the individual digits in your node number. Here’s the code block you can copy as a starting point.
[sip-phones]
exten => 578490,1,Answer
exten => 578490,n,Wait(2)
exten => 578490,n,Playback(rpt/node)
exten => 578490,n,Playback(digits/5)
exten => 578490,n,Playback(digits/7)
exten => 578490,n,Playback(digits/8)
exten => 578490,n,Playback(digits/4)
exten => 578490,n,Playback(digits/9)
exten => 578490,n,Playback(digits/0)
exten => 578490,n,Rpt,578490|P|${CALLERID(name)}
exten => 501,1,NoOp(SIP Phone 1)
exten => 501,n,Dial(SIP/501)
And again, save the file.
Step 4: Restart Asterisk
Since you’re already in a terminal window, you can restart Asterisk with this command:
sudo astres.shHowever, it may be just as well to reboot the node:
sudo reboot nowNext, configure port forwards on your router
I am forwarding three ports to my ClearNode IP address.
Port 4567 is set in the ClearNode app to match the port set for the AllStarLink server at https://allstarlink.org/portal/servers.php. It is also found in /etc/asterisk/iax.conf and /etc/asterisk/rpt.conf. My router has UDP port 4567 forwarded to my ClearNode at 192.168.1.162.
Port 5038 is set in /etc/asterisk/manager.conf as the manager port. My router has TCP/UDP port 5038 forwarded to the ClearNode IP address.
Port 5060 is set in /etc/asterisk/sip.conf. My router has UDP port 5060 forwarded to the ClearNode IP address.
Finally, configure your SIP phone
This is going to be more complicated than configuring your ClearNode because I don’t know what phone you are using. I’ll illustrate what I did on my Polycom VVX 401 phone and hope that you can extrapolate the pertinent details to your phone. I’ve used Cisco, Yealink, Snom, and Polycom phones. Each phone configuration interface is different, and frankly, each requires some fiddling to find what works.
Here’s what my configuration looks like. I put my ClearNode on Line 7 of my 12-line phone:
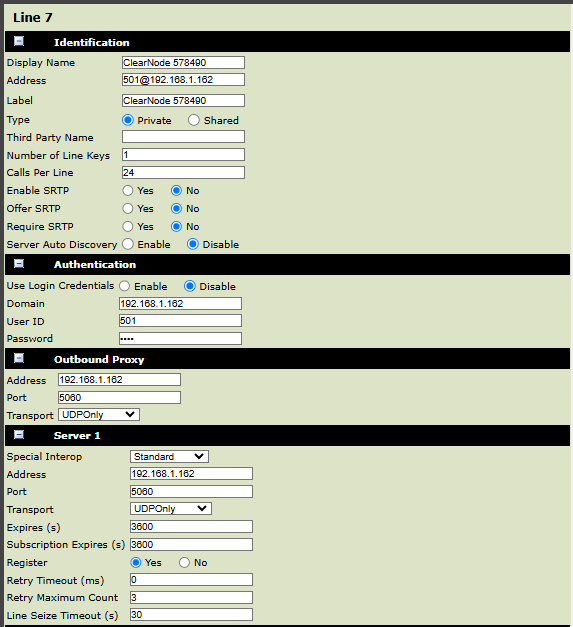
The ClearNode is at IP address 192.168.1.162 on my network. I’m using port 5060 and have specified the UDP protocol.
Do you remember the [501] extension you set up in sip.conf? 501 translates to the user name in the SIP phone configuration. The server or domain is the IP address of the ClearNode.
I have found that some SIP phones will accept just the user name (501 in this case) for the identification address. Sometimes just the IP address works. In my Polycom phone, I had to tell it the user and IP: 501@192.168.1.162.
Configuring your phone is where you’ll need to play a bit with the settings because each brand and model of phone is a little different.
One gotcha
There is a hidden “gotcha” that will crop up. Says Gerry Filby (Node-Ventures.com) who obviously knows these ClearNode systems best:
The Achilles Heel is going to be that modules.conf gets rewritten from our template every time you send your configuration from the smart phone app.
You could edit the template /usr/local/rednode/templates/modules.conf_tpl to include your changes - but keep a safety copy because the templates get re-written when you accept a "RedNode API" update, which are frequent.
I haven’t run into this yet, but now that I know it is waiting to get me, I know how to fix it! Many thanks to Gerry for this intel!
I logged into my ClearNode over an SSH connection, changed the directory, and made a copy of the modules.conf_tpl file:
cd /usr/local/rednode/templates
cp modules.conf_tpl modules.conf_tpl-saved
Once that “safety copy” was saved, I edited the modules.conf_tpl file and changed the last line from noload to load. Remember to save your change! In nano, hit Ctrl X and answer Y to save.
Updates
UPDATE 1: Several days later, my ClearNode had an update available, so I went ahead and applied the update. After the update, my SIP phone connection no longer worked. I fixed this by editing /etc/asterisk/modules.conf as detailed earlier in this TechNote.
UPDATE 2: It turns out that my /etc/asterisk/extensions.conf file was also overwritten during the update process. After re-entering and saving the [sip-phones] stanza in extensions.conf, I made a copy of the template file and added the [sip-phones] stanza, there, too.
UPDATE 3: There are also files lurking in /etc/asterisk/ that are the configuration files as previously saved, e.g.: /etc/asterisk/extensions.conf_last and modules.conf_last. I think these were used when the node updated rather than the _tpl files in /usr/local/rednode/. To test this, I’ve:
Saved a copy of extensions.conf as extensions.conf-saved and a copy of modules.conf as modules.conf-saved
Did not edit the _last files /etc/asterisk/
Did edit the _tpl files in /usr/local/rednode/
We’ll see what happens at the next update!
Troubleshooting
You can check your progress by calling up the Asterisk command-line interface (the CLI) in the node’s terminal window:
asterisk -rvvvvWatch the Asterisk CLI as your phone tries to authenticate to your node, and also when you are dialing. Here’s what my successful connection looks like in the Asterisk CLI:

You also use the “sip show peers” command in the CLI to check on the connection to your phone. (Note that this works in ASL2-based systems but not in ASL3 systems.) My phone is at 192.168.1.179 and the “sip show peers” shows the connection:

Notice that extension 501 is called the name or username in SIP. Hopefully, this helps the configuration file terminology make a little more sense.
Then what?
I also have the AllScan favorites management tool installed on my ClearNode. While I can use DTMF codes to make and break connections to other nodes from my SIP phone (for example, dial *351018 to connect to node 51018 and *151018 to disconnect), I prefer using the AllScan interface. It looks like this:

I don’t understand why my connection shows up as an IAX connection when I configured it as a SIP connection. The connection appears as an IAX connection because IAX is configured in the ClearNode. In the ClearNode app on Android, open the app and then tap your node number. From there, scroll down to find the “Node setup” section and tap “AllStar Setup.” Under “AllStar Server,” you’ll find a toggle to enable or disable IAX. In my ClearNode app, IAX is toggled “on.”
This hasn’t happened with my other nodes. For example, my ASL 3 node 588416 looks like this in AllScan:

And when I connect to the ClearNode from my node in Olympia, it looks like I expect it to look:

However, the connection to my ClearNode works, and that’s what I was trying to achieve.
