

TechNote: Connect your AllStarLink node to a Windows PC with IAXRPT
TechNote-8, March 29, 2025: How to configure your node to connect to your Windows PC with the IAXRPT application. #technote

TechNotes available
TechNote 4: Configuring DVSwitch Mobile for your AllStar node
TechNote 6: Using the Groundwire Softphone with Hamshack Hotline
Connect your AllStarLink node to a Windows PC with IAXRPT
As I was working through several aspects of AllStarLink and HamVoIP AllStar nodes, I realized I’ve not talked about using the IAXRPT client on Windows. This is actually one of the simpler ways to use ASL. You don’t need a radio. You don’t need a SIP phone. What you need is a working AllStarLink (ASL) node, the IAXRPT Windows application (free), and a Windows computer with microphone and speakers.
David Gleason NR9V, an electrical and software engineer, AllScan creator, and builder of great nodes, also notes:
“Another nice feature of iaxRpt is it can be used for recording IAX traffic. Just run Audacity and set the record input to iaxRpt's output. You can then record the exact PCM data coming in from other nodes. Similarly, audio can be routed into iaxRpt, e.g. to play back a news recording to a net.”
Let’s take a look.
My local node
I configured this for my node 588415 in my Olympia, Washington office. It sits on my local network at IP address 192.168.0.166. If you don’t know the IP address of your ASL node, check your router for IP address assignments, or scan your LAN (I use freeware called Advanced IP Scanner) to check your address range.
You’ll need the IP address to connect to your node over SSH and edit two files. (I am not covering how to SSH into your node in this TechNote.)
Node 588415 is an ASL 3 node running on Debian 12. The hardware I’m using is a Dell OptiPlex 7050 that sits behind my amateur radio SIP phone in Olympia, Washington.

The 7050 platform is overkill but I like having the extra processing power and storage.
First, edit your node configuration
You will need to SSH into your node and change to the /etc/asterisk directory. For this, I use the venerable Windows program PuTTY.

The two files to edit are iax.conf and extensions.conf. Before doing so, it’s always a good idea to update your system. Refresh your package listing with:
sudo apt updateIf apt update finds new packages, install them:
sudo apt upgrade -yOK, with that best practice out of the way, let’s proceed. I prefer using the Nano editor, so to edit iax.conf, I type:
sudo nano iax.confThe first thing you’ll want to confirm is your bindport setting. Find this at the top of the iax.conf file under the [general] heading. It’s a good idea to check to see if you have already set the bindaddr, too. If it is specified, make sure it matches the IP address of your node.

Above we see that I’ve specified port 4569 (which is the default port for ASL nodes) and the IP address of node 588415.
Then scroll down to find the section that starts with [iaxrpt]. (Below, I’ve erased my password in the screenshot. The “secret” is the password you’ll use to connect the IAXRPT Windows application to your node.) For ASL 3, you can leave all the defaults in place except for the “secret” which you’ll want to change to a secure password known only to you.

(Note that some implementations don’t have the requirecalltoken = no line present so you may need to add that. I noticed this on one node while watching the Asterisk CLI [more on this in the “test your connection” section below] as I tried to connect IAXRPT to the node.)
Once you’re done with iax.conf, save it by pressing Ctrl X, then answer Y to save.
Now open extensions.conf with the sudo nano extensions.conf command. The extensions.conf file is quite a bit longer than the iax.conf file so use the section headings in square brackets to avoid getting lost.
Scroll down to find the [iaxrpt] section. In my installation, [iaxrpt] is just above the [iax-client] section. At the end of the short [iaxrpt] section, remove the semicolon from the string marked as being for ASL 3 and replace the default node number with your node number in two places in that string (if you don’t see the correct string, use the screenshot below as a model):

Then Ctrl X and answer Y to save.
To make these edits active, restart Asterisk. You can do that with a shell script like this:
sudo astres.shYou can also do it by telling the system to reload Asterisk like this:
sudo systemctl reload asteriskAt this stage, I suggest you leave your shell open to monitor the connection you’ll be making in a few minutes.
Second, install and configure IAXRPT for Windows
Download IAXRPT
You can find the download link for the IAXRPT application for Windows in the AllStarLink community wiki at: https://wiki.allstarlink.org/wiki/Setup/Download_IAXRpt
Note that the download page has useful information. Use it for reference as needed.
IAXRPT is a 32-bit program and it doesn’t use a lot of memory. On my system, it is using 6.6 megabytes of memory, less than 1% of the CPU, and only 0.1 Mbps of network bandwidth.
Install IAXRPT
Double-click the downloaded file to install IAXRPT.
Run IAXRPT for the first time
In the Windows search box on the task bar, type IAXRPT and select Run iaxRpt. The program will start and a popup will let you know that no accounts have been configured:

The application looks like this with no accounts yet added:

To add your node, click Options in the top menu and select Accounts, then click the Add button in the popup.


Here is the Add an Account popup:
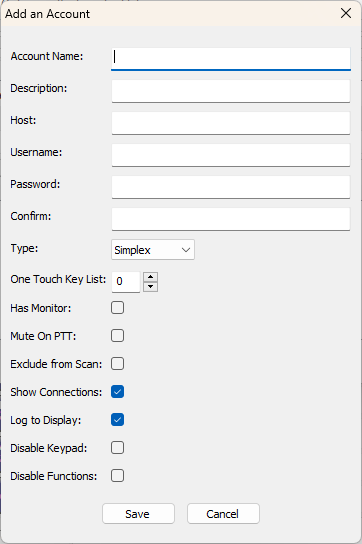
Enter your information (mine looks like the screenshot below). I used my node number for the Account Name. The Host is my IP address and the port number. The Username is the section heading [iaxrpt] without the square brackets. The Password is what you set in the iax.conf file. Type the password again in the Confirm field. Make sure the Type says Simplex (it should as that is the default).
When you’re done, click Save, then click Done.

You should now see your node in IAXRPT in the field to the right of the Call notation.

Third, test your connection
To test that you have a working connection between your node and your computer, click the Connect button in the IAXRPT app. You should see OK in the call state near the top of the application screen.

If it says OK, you have successfully connected your Windows computer to your AllStarLink node.
You can also monitor this in the Asterisk CLI. In the terminal window you left open after restarting Asterisk, start the CLI with this command string, then press Enter:
sudo asterisk -rvvvvWhen I clicked the Connect button in the IAXRPT application, the Asterisk CLI reported a successful connection, like this:

(The Asterisk CLI is a great tool in your AllStarLink toolbox. You can learn a lot about what is happening by watching your node in the CLI.)
In the IAXRPT application, you connect to other nodes using DTMF codes. For example, to connect to my cloud node 57945, I use the keypad in the IAXRPT application to enter the remote node number, starting with an asterisk and a 3:
*357945It’s a bit hard to tell in the IAXRPT app that you are connected, but look at the bottom for “Selected Call Received Command Complete Message”.

I prefer to confirm the connection by using the great AllScan favorites management tool installed on my node and accessed from my computer:

Once AllScan is installed and properly configured, you can use it to connect your node to another node. For example, after I selected node 51288 with AllScan, I am hearing the audio through my computer speakers.

Fourth, test your transmit audio
It may not be immediately evident how to transmit using IAXRPT. There is a long button labeled TRANSMIT at the bottom of the application screen. You don’t hold it down — you click it once to transmit, then click it again to stop transmitting. The button will turn red when it is in transmit mode:

You should test with the enhanced parrot at node 55553. You may find that the parrot reports your audio is very, very low, as was the case for me. If so, open the Options choice in the IAXRPT top menu and select Devices. If your input device is correct, check the Microphone Audio Input Level three-quarters of the way down the popup:

My input level was set all the way to the left. Moving it to the middle or to the right of middle, clicking Done, and testing again by transmitting to the 55553 parrot, I get good audio reports from the parrot.
For reference, you may find it helpful to also watch this 20-minute video by W9FFF:
The video is instructive and thorough. If you learn by seeing and hearing, the video is a perfect choice.
What if you use an iOS device?
If you use an Apple iPhone, iPad, or Mac computer, you have a couple of great applications available: Transceive and RepeaterPhone.
Transceive: https://transceive.app/
RepeaterPhone: https://repeaterphone.com/
I have the RepeaterPhone app and find it works very well.
EDIT: Access your node remotely with Tailscale
I note, too, that you can use IAXRPT to access your node remotely if the computer with IAXRPT installed is running Tailscale, and if your node is running Tailscale. If so, you can find the Tailscale address of your node and use that in the Options, Accounts dialogue. I did not have to specify port 4569 because I am using that default port for my 578492 node in Portland, Oregon, but if you are using a different port, you should specify that after the IP address, e.g., 123.45.67.890:4568.


What does this mean? It means if you have a traveling laptop with Tailscale on it, you can operate your node from remote locations if you have a decent internet connection!
